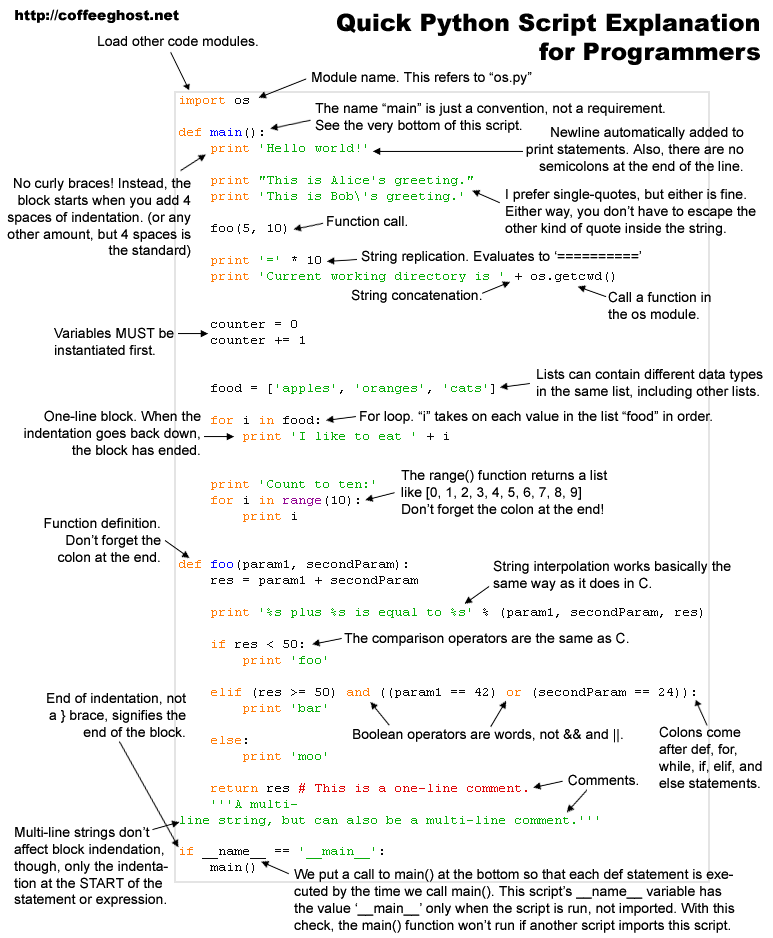
Quick Python Script Expalanation for Programmers from http://coffeeghost.net
中文版 from http://wiki.woodpecker.org.cn/

Python 2.6 Quick Reference
$ cat /boot/config-`uname -r` | grep KSM
CONFIG_KSM=y
pages_shared how many shared pages are being used
pages_sharing how many more sites are sharing them i.e. how much saved
pages_unshared how many pages unique but repeatedly checked for merging
pages_volatile how many pages changing too fast to be placed in a tree
full_scans how many times all mergeable areas have been scanned
run Whether the KSM process is running.
sleep_millisecs how many milliseconds ksmd should sleep before performing another page scan.
echo 1 > /sys/kernel/mm/ksm/run
/opt/bin/qemu -hda xp.raw -m 1024 &
/opt/bin/qemu -hda xp2.raw -m 1024 &


sudo modprobe 8021q
sudo vconfig add eth0 111
Added VLAN with VID == 111 to IF -:eth0:-
3. start up eth0.111
sudo ifconfig eth0.111 192.168.1.2 up
sudo ifconfig eth0.111 192.168.1.25. 利用 wireshark 抓出來的封包
eth0.111  Link encap:Ethernet  HWaddr 00:21:70:ff:d7:88
          inet addr:192.168.1.2  Bcast:192.168.1.255  Mask:255.255.255.0
          inet6 addr: fe80::221:70ff:feff:d788/64 Scope:Link
          UP BROADCAST RUNNING MULTICAST  MTU:1500  Metric:1
          RX packets:0 errors:0 dropped:0 overruns:0 frame:0
          TX packets:3 errors:0 dropped:0 overruns:0 carrier:0
          collisions:0 txqueuelen:0
          RX bytes:0 (0.0 B)  TX bytes:238 (238.0 B)

1)PPA-based (UbuntuMobile & Milone):2. IM
wget http://gma500re.altervista.org/scripts/poulsbo_ppa.sh && sh ./poulsbo_ppa.sh
or
2) FTP-based (no ppa repositories):
wget http://gma500re.altervista.org/scripts/poulsbo.sh && sh ./poulsbo.sh
http://vicamo.blogspot.com/2009/07/boshiamy-for-ibus.html3. pen screen
工人舍SH8安裝Ubuntu 9.04 netbook remix初步心得
penmount Driver Download
void __cyg_profile_func_enter (void *this_fn, void *call_site);
void __cyg_profile_func_exit  (void *this_fn, void *call_site);
#includevoid __attribute__((__no_instrument_function__)) __cyg_profile_func_enter(void *this_func, void *call_site) { printf("Enter &%s:%p, called by %p \n", __FUNCTION__, this_func, call_site); } void __attribute__((__no_instrument_function__)) __cyg_profile_func_exit(void *this_func, void *call_site) { printf("Enter &%s:%p, called by %p \n", __FUNCTION__, this_func, call_site); } void a(void); void b(void); void b() { } void a() { b(); } int main(int argc, const char *argv[]) { a(); return 0; }
digraph G {
node1;
node2;
node3;

node1 -> node2 [label="edge_1_2"];
node1 -> node3 [label="edge_1_3"];
node2 -> node3 [label="edge_2_3"];
}
dot -Tjpg graph.dot -o graph.jpg產生出來的圖

sudo mkfs.vfat /dev/sdd1
sudo mkdir /media/flash_disk
sudo mount /dev/sdd1 /media/flash_disk/
sudo grub-install --no-floppy --root-directory=/media/flash_disk/ /dev/sdd
set timeout=10
set default=0
menuentry "Run Ubuntu Live 10.04" {
loopback loop /ubuntu-10.04-desktop-i386.iso
linux (loop)/casper/vmlinuz boot=casper iso-scan/filename=/ubuntu-10.04-desktop-i386.iso splash --
initrd (loop)/casper/initrd.lz
}
menuentry "Ubuntu 10.4 Server i386" {
loopback loop /ubuntu-10.04-server-i386.iso
linux (loop)/install/vmlinuz --
initrd (loop)/install/initrd.gz
}
cp ubuntu-10.04-desktop-i386 /media/flash_disk/
sudo /opt/bin/qemu -hda /dev/sdd -boot c -m 256 -localtime
NOTE: Once in the CLI, you will need to enter configuration mode usingNOTE: the 'configure' command to make any required changes. For example,NOTE: to reset the root password, type:NOTE: configureNOTE: set system root-authentication plain-text-passwordNOTE: (enter the new password when asked)NOTE: commitNOTE: exitNOTE: exitNOTE: When you exit the CLI, you will be asked if you want to rebootNOTE: the system

function! UPDATE_TAGS()let _f_ = expand("%:p")let _cmd_ = '"ctags -a -f /dvr/tags --c++-kinds=+p --fields=+iaS --extra=+q " ' . '"' . _f_ . '"'let _resp = system(_cmd_)unlet _cmd_unlet _f_unlet _respendfunctionautocmd BufWritePost *.cpp,*.h,*.c call UPDATE_TAGS()
nmap:!find . -iname '*.c' -o -iname '*.cpp' -o -iname '*.h' -o -iname '*.hpp' > cscope.files
 如果是 0 的話,我們需要先做一些動作,才有辨法開啟 core dump 的功能.
* soft core unlimited2. 開一個新的 terminal,輸入 ulimit -c,此時因該還是0, 利用 ulimit -c unlimited,更改成 unlimited。
/*
* file name: wrong.c
* gcc -g wrong.c -o wrong
*/

#include
#include

void func3()
{
//go to dia;
char *x = 0x0;
*x = 1;
printf("%s", x);
strcpy(x, "This is wrong");
}

void func2(void)
{
func3();
}

void func1(void)
{
func2();
}


int main(void)
{
func1();
return 0;
}
程式記憶體區段錯誤 (core dumped)如沒有意外的話,因該可以看到多出了一個 core 的檔案
$file core有了 core file 之後,我們就可以利用 gdb 來做 backtrace
core: ELF 32-bit LSB core file Intel 80386, version 1 (SYSV), SVR4-style, from './wrong'
$ gdb wrong core
Core was generated by `./wrong'.我們大概可以知道是停在 func3 裡,透過 print 可知道,發生了什麼事
Program terminated with signal 11, Segmentation fault.
#0 0x08048264 in func3 () at wrong.c:8
warning: Source file is more recent than executable.
8
(gdb) p x另外,最好用的當然是 backtrace
$1 = 0x0
(gdb) p *x
Cannot access memory at address 0x0
(gdb) wherewhere 指令,我們能很清楚的知道是從
#0 0x08048264 in func3 () at wrong.c:8
#1 0x080482a4 in func2 () at wrong.c:15
#2 0x080482b1 in func1 () at wrong.c:20
#3 0x080482be in main () at wrong.c:26
(gdb) help where
Print backtrace of all stack frames, or innermost COUNT frames.
With a negative argument, print outermost -COUNT frames.
Use of the 'full' qualifier also prints the values of the local variables.
main -> func1 -> func2 -> func3另外還有一種情況是,程式掉進 trap,而不會觸發 SIGEGV signal,此時可以利用 xiaosuo 寫的 dumper 讓你所想要的程式觸發 signal 產生 core file。
void func3()
{
 //go into loop;
 while(1){
     sleep(1);
 }
}
./wrong_loop &當然,我們都知道,它是不會中止的,此時可以利用 dumper 來中止 wrong_loop 且產生 core file
[1] 31908
$ ./dumper 31908 -k產生了 core 我們就可利用 GDB 來debug
Start injecting(31908)...OK
[1]+ 不合法的命令 (core dumped) ./wrong_loop
$
$ file core
core: ELF 32-bit LSB core file Intel 80386, version 1 (SYSV), SVR4-style, from './wrong_loop'
$ gdb wrong_loop core
.....
Program terminated with signal 4, Illegal instruction.
#0 0xbfe0f4dc in ?? ()
(gdb) where
#0 0xbfe0f4dc in ?? ()
#1 0x08048266 in func3 () at wrong_loop.c:8
#2 0x08048273 in func2 () at wrong_loop.c:14
#3 0x08048280 in func1 () at wrong_loop.c:19
#4 0x0804828d in main () at wrong_loop.c:25
(gdb)
fails to set permissions的 error,不過可自行更改一下 sync 的設定檔,加入下面二行
owner=false
perms=0

-nbad -bap -nbc -bbo -bl -bli2 -bls -ncdb -nce -cp1 -cs -di2 -ndj -nfc1 -nfca -hnl -i2 -ip5 -lp -pcs -nprs -psl -saf -sai -saw -nsc -nsob

-nbad -bap -bbo -nbc -br -brs -c33 -cd33 -ncdb -ce -ci4 -cli0 -cp33 -cs -d0 -di1 -nfc1 -nfca -hnl -i4 -ip0 -l75 -lp -npcs -nprs -npsl -saf -sai -saw -nsc -nsob -nss

-nbad -nbap -bbo -bc -br -brs -c33 -cd33 -cdb -ce -ci4 -cli0 -cp33 -di16 -fc1 -fca -hnl -i4 -ip4 -l75 -lp -npcs -nprs -psl -saf -sai -saw -sc -nsob -nss -ts8

-nbad -bap -nbc -bbo -hnl -br -brs -c33 -cd33 -ncdb -ce -ci4 -cli0 -d0 -di1 -nfc1 -i8 -ip0 -l80 -lp -npcs -nprs -npsl -sai -saf -saw -ncs -nsc -sob -nfca -cp33 -ss -ts8 -il1

Generating public/private rsa key pair.2. scp ~/.ssh/*.pub 你欲登入的主機:~/.ssh/.
Enter file in which to save the key (/home/username/.ssh/id_rsa): [按 Enter 使用預設值(建議)]
Enter passphrase: 輸入你的 Passphrase
Enter same passphrase again: 再一次輸入你的 Passphrase
Your identification has been saved in /home/username/.ssh/id_rsa.
Your public key has been saved in /home/username/.ssh/id_rsa.pub.
The key fingerprint is: cc:e8:a9:da:a3:41:c6:a9:97:52:59:ef:0c:cf:45:b6 username@abc.com
Visual Diff Tools in Linux
2. sudo dpkg --configure -a#!/bin/bash
#Version: 1.0
#Info: Bash script to install mscorefonts without using
#currently broken ttf-mscorefonts-installer (3.0) for
#Ubuntu 9.10 Karmic Koala (date: 03/11/09)#Author: Jonathan K.
#Website: http://www.friendlytec hninja. vndv.com
#Email:#License: This is free to use and distribute (for free only) as long as
#credit is given to original author.#Create temp and mscorefonts dir
sudo mkdir /usr/share/fonts/truetype/ mscorefonts
mkdir /tmp/mscorefonts
cd /tmp/mscorefonts#Download links
wget http://sourceforge. net/projects/ corefonts/ files/the% 20fonts/ final/andale32. exe/download? use_mirror= cdnetworks- kr-1
wget http://sourceforge. net/projects/ corefonts/ files/the% 20fonts/ final/arial32. exe/download? use_mirror= cdnetworks- kr-1
wget http://sourceforge. net/projects/ corefonts/ files/the% 20fonts/ final/arialb32. exe/download? use_mirror= cdnetworks- kr-1
wget http://sourceforge. net/projects/ corefonts/ files/the% 20fonts/ final/comic32. exe/download? use_mirror= cdnetworks- kr-1
wget http://sourceforge. net/projects/ corefonts/ files/the% 20fonts/ final/courie32. exe/download? use_mirror= cdnetworks- kr-1
wget http://sourceforge. net/projects/ corefonts/ files/the% 20fonts/ final/georgi32. exe/download? use_mirror= cdnetworks- kr-1
wget http://sourceforge. net/projects/ corefonts/ files/the% 20fonts/ final/impact32. exe/download? use_mirror= cdnetworks- kr-1
wget http://sourceforge. net/projects/ corefonts/ files/the% 20fonts/ final/times32. exe/download? use_mirror= cdnetworks- kr-1
wget http://sourceforge. net/projects/ corefonts/ files/the% 20fonts/ final/trebuc32. exe/download? use_mirror= cdnetworks- kr-1
wget http://sourceforge. net/projects/ corefonts/ files/the% 20fonts/ final/verdan32. exe/download? use_mirror= cdnetworks- kr-1
wget http://sourceforge. net/projects/ corefonts/ files/the% 20fonts/ final/webdin32. exe/download? use_mirror= cdnetworks- kr-1 #Extract all .tff files
cabextract *.exe -F*.ttf -L#Rename files and move files
sudo cp andalemo.ttf /usr/share/fonts/truetype/ mscorefonts/ Andale_ Mono.ttf
sudo cp ariali.ttf /usr/share/fonts/truetype/ mscorefonts/ Arial_Italic. ttf
sudo cp arialbd.ttf /usr/share/fonts/truetype/ mscorefonts/ Arial_Bold. ttf
sudo cp arialbi.ttf /usr/share/fonts/truetype/ mscorefonts/ Arial_Bold_ Italic. ttf
sudo cp arial.ttf /usr/share/fonts/truetype/ mscorefonts/ Arial.ttf
sudo cp ariblk.ttf /usr/share/fonts/truetype/ mscorefonts/ Arial_Black. ttf
sudo cp comicbd.ttf /usr/share/fonts/truetype/ mscorefonts/ Comic_Sans_ MS_Bold. ttf
sudo cp comic.ttf /usr/share/fonts/truetype/ mscorefonts/ Comic_Sans_ MS.ttf
sudo cp cour.ttf /usr/share/fonts/truetype/ mscorefonts/ Courier_ New.ttf
sudo cp courbd.ttf /usr/share/fonts/truetype/ mscorefonts/ Courier_ New_Bold. ttf
sudo cp courbi.ttf /usr/share/fonts/truetype/ mscorefonts/ Courier_ New_Bold_ Italic. ttf
sudo cp couri.ttf /usr/share/fonts/truetype/ mscorefonts/ Courier_ New_Italic. ttf
sudo cp georgiaz.ttf /usr/share/fonts/truetype/ mscorefonts/ Georgia_ Bold_Italic. ttf
sudo cp georgiab.ttf /usr/share/fonts/truetype/ mscorefonts/ Georgia_ Bold.ttf
sudo cp georgiai.ttf /usr/share/fonts/truetype/ mscorefonts/ Georgia_ Italic. ttf
sudo cp georgia.ttf /usr/share/fonts/truetype/ mscorefonts/ Georgia. ttf
sudo cp impact.ttf /usr/share/fonts/truetype/ mscorefonts/ Impact. ttf
sudo cp times.ttf /usr/share/fonts/truetype/ mscorefonts/ Times_New_ Roman.ttf
sudo cp timesbd.ttf /usr/share/fonts/truetype/ mscorefonts/ Times_New_ Roman_Bold. ttf
sudo cp timesbi.ttf /usr/share/fonts/truetype/ mscorefonts/ Times_New_ Roman_Bold_ Italic. ttf
sudo cp timesi.ttf /usr/share/fonts/truetype/ mscorefonts/ Times_New_ Roman_Italic. ttf
sudo cp trebuc.ttf /usr/share/fonts/truetype/ mscorefonts/ Trebuchet_ MS.ttf
sudo cp trebucbd.ttf /usr/share/fonts/truetype/ mscorefonts/ Trebuchet_ MS_Bold. ttf
sudo cp trebucbi.ttf /usr/share/fonts/truetype/ mscorefonts/ Trebuchet_ MS_Bold_ Italic. ttf
sudo cp trebucit.ttf /usr/share/fonts/truetype/ mscorefonts/ Trebuchet_ MS_Italic. ttf
sudo cp verdanab.ttf /usr/share/fonts/truetype/ mscorefonts/ Verdana_ Bold.ttf
sudo cp verdanai.ttf /usr/share/fonts/truetype/ mscorefonts/ Verdana_ Italic. ttf
sudo cp verdanaz.ttf /usr/share/fonts/truetype/ mscorefonts/ Verdana_ Bold_Italic. ttf
sudo cp verdana.ttf /usr/share/fonts/truetype/ mscorefonts/ Verdana. ttf
sudo cp webdings.ttf /usr/share/fonts/truetype/ mscorefonts/ Webdings. ttf #Clean up
cd ~
rm -r /tmp/mscorefonts