Dec 27, 2009

linux's core dump

core dump 的目地是當你的程式跑到一半當掉(異常中止跳出或freeze)時,我們可從 core 中得到最後掛在那裡,在加上 backtrace 就能快速的找出那裡有 bug :).

先認定 core file size: ulimit -a
如果是 0 的話,我們需要先做一些動作,才有辨法開啟 core dump 的功能.
1. sudo vi /etc/security/limits.conf, 加入這行
* soft core unlimited
2. 開一個新的 terminal,輸入 ulimit -c,此時因該還是0, 利用 ulimit -c unlimited,更改成 unlimited。

設定完 core file size 之後,我使用下面程式來測試 debgu 的效果

/*
* file name: wrong.c
* gcc -g wrong.c -o wrong
*/

#include
#include

void func3()
{
//go to dia;
char *x = 0x0;
*x = 1;
printf("%s", x);
strcpy(x, "This is wrong");
}

void func2(void)
{
func3();
}

void func1(void)
{
func2();
}


int main(void)
{
func1();
return 0;
}

執行結果為:
程式記憶體區段錯誤 (core dumped)
如沒有意外的話,因該可以看到多出了一個 core 的檔案
$file core
core: ELF 32-bit LSB core file Intel 80386, version 1 (SYSV), SVR4-style, from './wrong'
有了 core file 之後,我們就可以利用 gdb 來做 backtrace
$ gdb wrong core
Core was generated by `./wrong'.
Program terminated with signal 11, Segmentation fault.
#0 0x08048264 in func3 () at wrong.c:8

warning: Source file is more recent than executable.
8
我們大概可以知道是停在 func3 裡,透過 print 可知道,發生了什麼事
(gdb) p x
$1 = 0x0
(gdb) p *x
Cannot access memory at address 0x0
另外,最好用的當然是 backtrace
(gdb) where
#0 0x08048264 in func3 () at wrong.c:8
#1 0x080482a4 in func2 () at wrong.c:15
#2 0x080482b1 in func1 () at wrong.c:20
#3 0x080482be in main () at wrong.c:26
(gdb) help where
Print backtrace of all stack frames, or innermost COUNT frames.
With a negative argument, print outermost -COUNT frames.
Use of the 'full' qualifier also prints the values of the local variables.
where 指令,我們能很清楚的知道是從
main -> func1 -> func2 -> func3
另外還有一種情況是,程式掉進 trap,而不會觸發 SIGEGV signal,此時可以利用 xiaosuo 寫的 dumper 讓你所想要的程式觸發 signal 產生 core file。

將 wrong.c 中的 func3 改成

void func3()
{
//go into loop;
while(1){
sleep(1);
}
}

compiler完之後,讓 wrong_loop 於背景執行
./wrong_loop &
[1] 31908
當然,我們都知道,它是不會中止的,此時可以利用 dumper 來中止 wrong_loop 且產生 core file
$ ./dumper 31908 -k
Start injecting(31908)...OK
[1]+ 不合法的命令 (core dumped) ./wrong_loop
$
$ file core
core: ELF 32-bit LSB core file Intel 80386, version 1 (SYSV), SVR4-style, from './wrong_loop'
產生了 core 我們就可利用 GDB 來debug
$ gdb wrong_loop core
.....
Program terminated with signal 4, Illegal instruction.
#0 0xbfe0f4dc in ?? ()
(gdb) where
#0 0xbfe0f4dc in ?? ()
#1 0x08048266 in func3 () at wrong_loop.c:8
#2 0x08048273 in func2 () at wrong_loop.c:14
#3 0x08048280 in func1 () at wrong_loop.c:19
#4 0x0804828d in main () at wrong_loop.c:25
(gdb)

Reference:

Dec 13, 2009

UNISON 無法備份目錄的問題

最近買了新的 usb stick,試了一下 unison 此 sync 軟體,發現無法備份目錄,會出現
fails to set permissions
的 error,不過可自行更改一下 sync 的設定檔,加入下面二行
owner=false
perms=0

Reference:

Dec 2, 2009

coding style

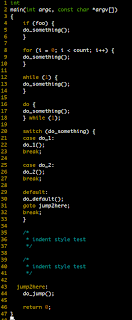
以前有試過使用 indent 讓自已的 code 長的"漂亮"一點,但每次都是久久用一次,常也忘了,自已喜歡的 style 是那一種,這次把 indent 提供的 四種 style (gnu, kr, orig, linux),整理一下,直接用圖來表示,那下次在看就能很方便的知道,各 style 是長怎樣。另外,如 -gnu,是它的 condig style而真正的它下面那一長串是這個 style 的細節,當然也可以直接用那一長串,自已在慢慢調成你要的。


還未 indent 過的 source code.


1. The GNU style: -gnu
-nbad -bap -nbc -bbo -bl -bli2 -bls -ncdb -nce -cp1 -cs -di2 -ndj -nfc1 -nfca -hnl -i2 -ip5 -lp -pcs -nprs -psl -saf -sai -saw -nsc -nsob


2. The Kernighan & Ritchie style: -kr
-nbad -bap -bbo -nbc -br -brs -c33 -cd33 -ncdb -ce -ci4 -cli0 -cp33 -cs -d0 -di1 -nfc1 -nfca -hnl -i4 -ip0 -l75 -lp -npcs -nprs -npsl -saf -sai -saw -nsc -nsob -nss


3. The original Berkeley style: : -orig
-nbad -nbap -bbo -bc -br -brs -c33 -cd33 -cdb -ce -ci4 -cli0 -cp33 -di16 -fc1 -fca -hnl -i4 -ip4 -l75 -lp -npcs -nprs -psl -saf -sai -saw -sc -nsob -nss -ts8


4. The Linux style: -linux
-nbad -bap -nbc -bbo -hnl -br -brs -c33 -cd33 -ncdb -ce -ci4 -cli0 -d0 -di1 -nfc1 -i8 -ip0 -l80 -lp -npcs -nprs -npsl -sai -saf -saw -ncs -nsc -sob -nfca -cp33 -ss -ts8 -il1


Nov 29, 2009

screen

這二天在想,因該好好的學習一下 screen 要怎麼使用,從最一開始使用 screen 只是很單純的把他當成一個不會因為斷線就無法執行之後工作的 terminal 來使用,從官方對於 screen 的簡介:
Screen is a full-screen window manager that multiplexes a physical terminal between several processes, typically interactive shells.
我想,我一直漏掉 multiplexes 的重要特色。

Reference:
  1. screen 中文教學 on debian wiki
  2. screenrc 分享
  3. Screen User's Manual

Nov 25, 2009

利用 rsa 登入 SSH Server

1. ssh-keygen -t rsa
Generating public/private rsa key pair.
Enter file in which to save the key (/home/username/.ssh/id_rsa): [按 Enter 使用預設值(建議)]
Enter passphrase: 輸入你的 Passphrase
Enter same passphrase again: 再一次輸入你的 Passphrase
Your identification has been saved in /home/username/.ssh/id_rsa.
Your public key has been saved in /home/username/.ssh/id_rsa.pub.
The key fingerprint is: cc:e8:a9:da:a3:41:c6:a9:97:52:59:ef:0c:cf:45:b6 username@abc.com
2. scp ~/.ssh/*.pub 你欲登入的主機:~/.ssh/.
3. ssh 你欲登入的主機
4. cat ~/.ssh/id_rsa.pub >> ~/.ssh/authorized_keys
5. chmod 711 ~/.ssh
6. chmod 644 ~/.ssh/authorized_keys

發現,用 ubuntu 9.10 完成以上這些動作,就可以直接登入主機,不需在使用 ssh-agent


Reference:
  1. ssh keygen 免輸入密碼
  2. SSH 免密碼登入
  3. PuTTY 免密碼登入
  4. OpenSSH Public Key Authentication

Nov 23, 2009

Diff & Merge tool

原本都是在 windows 下使用 WinMerge ,在Linux 下一直找不到好用的工具,上星期參加 H4 ,有人提到 vimdiff ,這二天 survey 了一下,有那些 diff merge tools 可以使用:

sdiff <- 單純印出,每一行的內容

vimdiff <- 好像沒辨法對目錄下所有的檔案做比較,希望可以像 meld 那樣

meld <- 目前試了一下,還不錯

kdiff3 <- 我大多是用 Gnome,不太想多裝 KDE lib

DiffMerge <- non-opensource


Reference:
Visual Diff Tools in Linux

超棒的 Debian 小技巧

今早看到 Rex 於 H4 mail-list ,分享給大家的 fortunes-debian-hints's zh_TW.po 裡面寫了蠻多好用的小技巧。

Debian 小技巧 #1: 您可以使用 reportbug 套件中的 'reportbug' 指令來回報問題,或者也可使用圖形化介面 'reportbug-ng'。

Debian 小技巧 #2: 您可以使用 'dpkg-reconfigure ' 變更在您第一次安裝一個套件時曾回答的問題。另外 'configure-debian' 套件為此提供了一個統一的介面。

Debian 小技巧 #3: 您可以使用 'apt-cache search <關鍵字>' 搜尋所有套件的描述的關鍵字。

Debian 小技巧 #4: 您可以使用 'apt-cache policy ' 查看可用的以及已安裝的所有候選套件的版本資訊。

Debian 小技巧 #5: 如果您需要編譯一個自定的核心,請使用 kernel-package 套件中的 'make-kpkg' 指令稿。

Debian 小技巧 #6: 第 #6 個提示不存在。今天就來生一個!

Debian 小技巧 #7: 您可以使用 cron-apt 套件每晚自動下載您更新套件。

Debian 小技巧 #8: 如果您在 Debian 中遇到的問題,無法透過閱讀手冊和文件解決,那麼請到 Debian 用戶郵遞論壇詢問 (簡: debian-chinese-gb@lists.debian.org,繁: debian-chinese-big5@lists.debian.org)。

Debian 小技巧 #9: 如果您需要知道目前正在使用的 Debian 是什麼版本,請查看 /etc/debian_version;如果您想知道那個版本的開發代號 (例如: 3.0 的開發代號是'Woody'),請參考此連結: http://www.debian.org/doc/FAQ/ch-ftparchives.html#s-codenames

Debian 小技巧 #10: Debian 郵遞論壇討論使用者問題或者 Debian 政策文件。瀏覽 http://www.debian.org/MailingLists/ 並訂閱您所感興趣的內容吧。

Debian 小技巧 #11: 關心新聞 - 閱讀 Debian Times。請於線上瀏覽 http://times.debian.net/

Debian 小技巧 #12: 有一個 grep-dctrl 套件提供了若干指令,它們可用來快速搜索各種套件的 control 檔 (像是套件中的檔案)。

Debian 小技巧 #13: 如果您不喜歡使用某個 Debian 套件的預設選項,您可以把它的源碼下載下來,按照您的偏好重新編譯一個版本。請參考 http://www.debian.org/doc/FAQ/ch-pkg_basics.html (第 6.13 和 6.14 節) 瞭解更多資訊。不過請記住,大部分軟體的多數選項都能夠在執行時進行設定,通常不必重新編譯套件。

Debian 小技巧 #14: 如果您想追蹤某個套件的發展 (比如說,如果您希望瞭解缺陷回報,發行通知以及其它類似資訊),請考慮在套件追蹤系統 (Package Tracking System)中訂閱。您可以於此找到有關套件跟蹤系統 (PTS) 的更多資訊:http://www.debian.org/doc/manuals/developers-reference/resources.html (第 4.10 節)

Debian 小技巧 #15: 一般而言套件的文件可以在 /usr/share/doc/ 下找到。特別注意 README.Debian 文件專門提供 Debian 專屬資訊。

Debian 小技巧 #16: 如果您正在搜索一個不知道屬於那個套件的檔案,請試試 'apt-file',它為這類資訊提供了一個小型的資料庫。或者您也可以從 Debian 套件資料庫中搜索這些內容,也可以進行檔案搜尋:"http://www.debian.org/distrib/packages#search_contents

Debian 小技巧 #17: 想找一些人聊聊 Debian 嗎? 如果您習慣於 IRC (Intenret Relay Chat) 聊天,只要安裝您慣用的 IRC 軟體,然後加入 irc.debian.org 的 #debian 或 #dot 或 #debian-zh 頻道就可以了。

Debian 小技巧 #18: 在 http://packages.qa.debian.org/ 可以找到套件的品管資訊。這個頁面提供了維護人員的品質保證網頁、BTS、套件新聞、以及檔案庫中的可用版本。

Debian 小技巧 #19: 如果您對從封裝軟體套件感興趣,您應該考慮安裝 apt-src 這個套件。

Debian 小技巧 #20: 想要持續追蹤某個您已安裝的套件版本紀錄 (對那些混用 stable / testing / unstable 系統的人尤其有用)?請試試 apt-show-versions。

Debian 小技巧 #21: 如果您的 Debian 機器所使用的連線速度很慢,但是您可以使用另一個比較快的網路,那麼請試試 apt-zip 套件。

Debian 小技巧 #22: 正在猶豫使用哪個 Debian 鏡像站?請試試 apt-spy 和 netselect-apt 套件,它們可以為您測試不同網站的速度。

Debian 小技巧 #23: 若您的系統佔用了太多的硬碟空間,請試試 deborphan 套件。它能建議您哪些套件是無用的且可刪除的。當然,別忘了清除掉 APT 暫存 (使用 'apt-get clean'、'aptitude clean'、或者 aptitude 工具選單中的 '動作'->'清除套件暫存' 選項)。

Debian 小技巧 #24: 如果您想感謝某個維護者對於所處理的問題的辛勞,請試試reportbug --kudos。

Debian 小技巧 #25: 'debian-reference' 套件為 Debian 使用者和開發人員提供了非常廣泛的參考文件。其中大多數資訊都在這個連結:http://www.debian.org/doc/manuals/reference。

Debian 小技巧 #26: 如果一個套件沒有足夠的參考文件,那麼請查找名為 -doc 的套件,並確認已經安裝。通常含有大量文件的套件會被拆開,這是考慮到某些使用者並不想安裝文件。

Debian 小技巧 #27: 請定期檢查您的備份。您*確定*備份無誤了,對吧? 對吧?(此技巧帶給您的當頭棒喝是 '徹' '底' '崩' '潰',以及「空」。)

Debian 小技巧 #28: 如果您的機器並非持續處於開機狀態 (例如一台筆記型電腦),請試試 'anacron' 套件。即使在機器並未開機,它能夠確保讓該定期執行的軟體依然被啟動。

Debian 小技巧 #29: 保持您系統時鐘的精確性 - 請安裝 'ntpdate' 套件並且設定為每次開機自動啟動。另外,經常開機的機器應該通過安裝 'ntp' 套件在每次開機時進校時。

Debian 小技巧 #30: 若安裝了 'doc-base' 和 'doc-central' 套件以及相依的套件後,就可以從 http://localhost/ 來瀏覽文件囉。

Debian 小技巧 #31: 停用一個特定 runlevel 的開機服務,應該是將 /etc/rc.d 中以 S 開頭的鏈接變更為 K 開頭的鏈接,而不是刪除那個鏈接。如果所有的鏈接都被刪除了,那麼系統在下次安裝升級套件時都將假定它們需要被替換。

Debian 小技巧 #34: 有一個 'doc-debian' 套件提供了一些有關 Debian 項目的通用文件。它還有西班牙語版本 (doc-debian-es)、法語版本 (doc-debian-fr) 和烏克蘭語版本 (doc-debian-uk)。

Debian 小技巧 #35: 'devscripts' 套件為那些希望改進 Debian 的使用者提供了一些有用的指令,如 wnpp-alert, rc-alert 以及 bts。

Debian 小技巧 #36: 如果您希望追蹤 Debian 開發版 (sid),但只有少量的下載權限或者一個頻寬很小的網路,請試試 debdelta 套件。

Debian 小技巧 #37: 搜尋遊戲嗎 ? 試試 'goplay' 吧,它提供了一個很棒的使用介面可瀏覽各種類型的遊戲。

Debian 小技巧 #38: 需要一些比 Debian 穩定版更新的套件,但又不願升級到 'testing' 或者 'unstable' 嗎? 有些更新套件擺在 volatile.debian.org,另一些套件可在 www.backports.org 找到。

Debian 小技巧 #39: 希望下載一個套件但卻不想安裝它?請用 'aptitude download '。

Debian 小技巧 #40: 想學會使用軟體的新技巧嗎? \"man\" 是你最佳好友! 在 shell 下打 \"man <程式名稱>\" 或者打 \"man -H <程式名稱>\" 在瀏覽器下閱讀操作手冊。

Debian 小技巧 #41: 安裝 bash-completion 軟體套件可增強 bash's 的 tab 補齊功能。

Debian 小技巧 #42: 如果你安裝了 command-not-found,當你鍵入系統未安裝之軟體時候,系統將會自動提醒你應該安裝那個套件。

Debian 小技巧 #3: 您可以使用 'apt-cache show <套件名稱>' 或 'aptitude show <套件名稱> 來取得套件的詳細描述。

Debian 小技巧 #44: 您可以使用 'apt-file list <套件名稱> 來查詢套件中所包含得檔案。這個指令很接近 dpkg -L,只是不需要安裝或先下載該套件。

Nov 22, 2009

dns timing issus when install ttf-mscorefonts

安裝 ttf-mscorefonts 會出現某些檔案無法下載,主要是因為下載時,wget 的參數 timeout 設的太短了,可參考 ubuntu Bug #431217

以下做簡單的筆記:
1. sudo vi /var/lib/dpkg/info/ttf-mscorefonts-installer.postinst #改成下面的內容

#!/bin/bash

#Version: 1.0
#Info: Bash script to install mscorefonts without using
#currently broken ttf-mscorefonts-installer (3.0) for
#Ubuntu 9.10 Karmic Koala (date: 03/11/09)

#Author: Jonathan K.
#Website: http://www.friendlytechninja.vndv.com
#Email:

#License: This is free to use and distribute (for free only) as long as
#credit is given to original author.

#Create temp and mscorefonts dir
sudo mkdir /usr/share/fonts/truetype/mscorefonts
mkdir /tmp/mscorefonts
cd /tmp/mscorefonts

#Download links
wget http://sourceforge.net/projects/corefonts/files/the%20fonts/final/andale32.exe/download?use_mirror=cdnetworks-kr-1
wget http://sourceforge.net/projects/corefonts/files/the%20fonts/final/arial32.exe/download?use_mirror=cdnetworks-kr-1
wget http://sourceforge.net/projects/corefonts/files/the%20fonts/final/arialb32.exe/download?use_mirror=cdnetworks-kr-1
wget http://sourceforge.net/projects/corefonts/files/the%20fonts/final/comic32.exe/download?use_mirror=cdnetworks-kr-1
wget http://sourceforge.net/projects/corefonts/files/the%20fonts/final/courie32.exe/download?use_mirror=cdnetworks-kr-1
wget http://sourceforge.net/projects/corefonts/files/the%20fonts/final/georgi32.exe/download?use_mirror=cdnetworks-kr-1
wget http://sourceforge.net/projects/corefonts/files/the%20fonts/final/impact32.exe/download?use_mirror=cdnetworks-kr-1
wget http://sourceforge.net/projects/corefonts/files/the%20fonts/final/times32.exe/download?use_mirror=cdnetworks-kr-1
wget http://sourceforge.net/projects/corefonts/files/the%20fonts/final/trebuc32.exe/download?use_mirror=cdnetworks-kr-1
wget http://sourceforge.net/projects/corefonts/files/the%20fonts/final/verdan32.exe/download?use_mirror=cdnetworks-kr-1
wget http://sourceforge.net/projects/corefonts/files/the%20fonts/final/webdin32.exe/download?use_mirror=cdnetworks-kr-1

#Extract all .tff files
cabextract *.exe -F*.ttf -L

#Rename files and move files
sudo cp andalemo.ttf /usr/share/fonts/truetype/mscorefonts/Andale_Mono.ttf
sudo cp ariali.ttf /usr/share/fonts/truetype/mscorefonts/Arial_Italic.ttf
sudo cp arialbd.ttf /usr/share/fonts/truetype/mscorefonts/Arial_Bold.ttf
sudo cp arialbi.ttf /usr/share/fonts/truetype/mscorefonts/Arial_Bold_Italic.ttf
sudo cp arial.ttf /usr/share/fonts/truetype/mscorefonts/Arial.ttf
sudo cp ariblk.ttf /usr/share/fonts/truetype/mscorefonts/Arial_Black.ttf
sudo cp comicbd.ttf /usr/share/fonts/truetype/mscorefonts/Comic_Sans_MS_Bold.ttf
sudo cp comic.ttf /usr/share/fonts/truetype/mscorefonts/Comic_Sans_MS.ttf
sudo cp cour.ttf /usr/share/fonts/truetype/mscorefonts/Courier_New.ttf
sudo cp courbd.ttf /usr/share/fonts/truetype/mscorefonts/Courier_New_Bold.ttf
sudo cp courbi.ttf /usr/share/fonts/truetype/mscorefonts/Courier_New_Bold_Italic.ttf
sudo cp couri.ttf /usr/share/fonts/truetype/mscorefonts/Courier_New_Italic.ttf
sudo cp georgiaz.ttf /usr/share/fonts/truetype/mscorefonts/Georgia_Bold_Italic.ttf
sudo cp georgiab.ttf /usr/share/fonts/truetype/mscorefonts/Georgia_Bold.ttf
sudo cp georgiai.ttf /usr/share/fonts/truetype/mscorefonts/Georgia_Italic.ttf
sudo cp georgia.ttf /usr/share/fonts/truetype/mscorefonts/Georgia.ttf
sudo cp impact.ttf /usr/share/fonts/truetype/mscorefonts/Impact.ttf
sudo cp times.ttf /usr/share/fonts/truetype/mscorefonts/Times_New_Roman.ttf
sudo cp timesbd.ttf /usr/share/fonts/truetype/mscorefonts/Times_New_Roman_Bold.ttf
sudo cp timesbi.ttf /usr/share/fonts/truetype/mscorefonts/Times_New_Roman_Bold_Italic.ttf
sudo cp timesi.ttf /usr/share/fonts/truetype/mscorefonts/Times_New_Roman_Italic.ttf
sudo cp trebuc.ttf /usr/share/fonts/truetype/mscorefonts/Trebuchet_MS.ttf
sudo cp trebucbd.ttf /usr/share/fonts/truetype/mscorefonts/Trebuchet_MS_Bold.ttf
sudo cp trebucbi.ttf /usr/share/fonts/truetype/mscorefonts/Trebuchet_MS_Bold_Italic.ttf
sudo cp trebucit.ttf /usr/share/fonts/truetype/mscorefonts/Trebuchet_MS_Italic.ttf
sudo cp verdanab.ttf /usr/share/fonts/truetype/mscorefonts/Verdana_Bold.ttf
sudo cp verdanai.ttf /usr/share/fonts/truetype/mscorefonts/Verdana_Italic.ttf
sudo cp verdanaz.ttf /usr/share/fonts/truetype/mscorefonts/Verdana_Bold_Italic.ttf
sudo cp verdana.ttf /usr/share/fonts/truetype/mscorefonts/Verdana.ttf
sudo cp webdings.ttf /usr/share/fonts/truetype/mscorefonts/Webdings.ttf

#Clean up
cd ~
rm -r /tmp/mscorefonts

2. sudo dpkg --configure -a

Free E-Book Download

應該選那一個 File System 呢?

Linux 2.6.28 之後,開始支援 EXT4,最近重灌 ubuntu 9.10 發現多了 EXT4 可以選擇,一開始還不確定是不是要直接升級到 EXT4 ,剛剛 Survey 了一下,我想,下直別想那麼多了,直接使用 EXT4 就好了

Reference:

Generate PDF by JS

Reference: 用 JavaScript 產生 PDF 檔

jspdf - jsPDF generates PDF documents using pure JavaScript

我的舊筆電 M2N 裝 Ubuntu 9.10

Reference: Ubuntu karmic freeze on Asus M2n

之前M2N上一直是使用 ubuntu 8.04 一直沒有升級,這次等 9.10 一出,一口氣從新安裝新版的 ubuntu,中間出現蠻多相容性的問題。

1. ubuntu 9.10 安裝時,多增加
acpi=off and nolapic
2. 安裝完之後,更改 grub 開機參數
/etc/default/grub
GRUB_CMDLINE_LINUX_DEFAULT 中加入 nolapic nomodeset
3. xorg.conf 改使用 vesa
Section "Device"
Identifier "Configured Video Device"
Driver "vesa"
EndSection

Section "Monitor"
Identifier "Configured Monitor"
EndSection

Section "Screen"
Identifier "Default Screen"
Monitor "Configured Monitor"
Device "Configured Video Device"
EndSection

Nov 16, 2009

dvtm || dynamic virtual terminal manager

上星期參加H4,看到這個有好玩的東西,下面是 Hot Key 筆記

Keyboard commands
Mod : 預設為 ^g, 更改於 config.h 或 -m 的方式
Mod-c : 新增一個 window.
Mod-x : 關閉目前 window.
Mod-l : 增加 5% 主視窗的寬度.
Mod-h : 減加 5% 主視窗的寬度.
Mod-j : 移到下一個視窗.
Mod-k : 移到上一個視窗.
Mod-[1..n] : 移到第 n 個視窗
Mod-. : Toggle minimization of current window.
Mod-u : Focus next non minimized window.
Mod-i : Focus prev non minimized window.
Mod-m : Maximize current window (change to fullscreen layout).
Mod-PageUp : Scroll up.
Mod-PageDown : Scroll down.
Mod-Space : Toggle between defined layouts (affects all windows).
Mod-Enter : Zooms/cycles current window to/from master area.
Mod-t : Change to vertical stack tiling layout.
Mod-b : Change to bottom stack tiling layout.
Mod-g : Change to grid layout.
Mod-s : Shows/hides the status bar.
Mod-r : Redraw whole screen.
Mod-G : Escape the next typed key.
Mod-X : Lock screen.
Mod-M : Toggle dvtm mouse grabbing. Mod-q Quit dvtm.

Mouse commands
Copy and Paste : 按 SHIFT 加左鍵反白要 Copy 的文字,SHIFT 加中鍵為貼上
Button1 click : Select window.
Button1 double click : Select window and toggle maximization.
Button2 click : Zooms/cycles current window to/from master area.
Button3 click : Toggle minimization of current window.

延申閱讀:

Apr 9, 2009

財報發佈時間

  • [月報]:次月的10日之前,只需要提供營收不需要獲利
  • [季報]:4月30日及10月31日前,需要提供獲利狀況
  • [半年報]:8月31日前,除了提供獲利還需要提供合併報表
  • [年報]:次年的4月30日日前,需提供最完整的財務資料

Mar 30, 2009

Change TimeZone in Linux

sudo ln -s /usr/share/zoneinfo/Asia/Taipei /etc/localtime

ubuntu gusty to hardy

今天重開回到之前灌的 ubuntu ,本來想直接升級到 8.10 發現版本差太多,安裝時就會出問題,所以先升級到 hardy 就好,但開完機發現,鍵盤數字鍵無法使用,原來是我的鍵盤鍵被改成滑鼠 XD,可以使用 Ctrl+Shift+Num 切回數字鍵功能,剛剛在網路上查,原來是 X-Window 快速鍵

Feb 25, 2009

auto login by expect


#!/usr/bin/expect

spawn telnet ptt.cc
expect "請輸入代號,或以[guest]參觀,以[new]註冊:"
send "{Your Name}\n"
send "{Your Password}\n"

send "\n"

interact timeout 90 {send "s"}
exit

Python, PyGTK & Glade

離上次使用PyGTK已經快二年的事了,最近自已有個計劃想試看看,還是一樣想使用PyGTK,今天發了一點時間,重新把回以前的感覺。

Feb 15, 2009

改變世界的12本書


作者簡介

梅爾文.布萊格(Melvyn Bragg)

   知名小說家、文化評論家、廣播與電視節目主持人。多年來領導並參與多項文化藝術文學機構,擁有十餘項榮譽學位,目前任里茲大學(University of Leeds)校長、英國國家藝術推廣協會(National Campaign for the Arts)主席及英國上議院成員。有三十餘本著作,包括十餘小說、文化評論及兩本童書。布萊格擁有深厚人文知識,推廣文學及藝術不遺餘力,數年來在英國的 廣播及電視上推廣知識、藝文教育,製作出很多令人激賞的節目。布萊格的出版品和影音作品早已在英國成為藝術推廣的知名招牌。


書中介紹的十二本書:

《數學原理》——揭示萬有引力,大開科學之門
《婚姻之愛》——兩性及婚姻寬細成為必修課題
《大憲章》——自由精神與人權法治的基礎
《足球比賽規章》——將運動與世界親密結合的經典
《物種起源》——重新定義了生命的起源
《廢除奴隸貿易》——各色人種升而平等的契機
《女權辯護》——婦女人權的首度顯現
《電的實驗研究》三卷——將黑暗與無知驅離的能源
《詹姆士王聖經》——確立英、美現代發展的精神基石
《國富論》——經濟與貿易命脈的寫實預言
《莎士比亞劇作第一個對開本》——改變全人類對故事的想像
序中,作者說明選擇這十二本書的理由
牛頓把人類帶上月球;法拉第把電帶給世界;達爾文挪走了人類自從開始有文明以來就一直存在的上帝和諸神;瑪麗.沃斯通克拉夫特開啟了女性尋求男女平權的濫觴;瑪麗.史托帕帶動了女性自身追求性愛滿足以及家庭生活辛福的風潮。有了韋爾白福斯畢生的努力,不同人種之間的懸殊地位始逐漸被拉近,而「大憲章」亦成了人類反抗暴政的基石。我們的市場依循著亞當.史密斯的諸律運作,我們的想像力被莎士比亞的著作鼓動到極致,我們的工作被阿克萊特所整合,我們的語言和宗教信念受到「詹姆士王聖經」塑造,我們今日雄踞天下的足球運動則奠基於「足球比賽規章」一書。

GARP, GVRP & GMRP

GARP
GARP defines the architecture, rules of operation, state machines and variables for the registration and de-registration of attribute values.
GVRP(GARP VLAN Registration Protocol)
GVRP provides a mechanism for dynamic maintenance of the contents of Dynamic VLAN Registration Entries for each VLAN, and for propagating the information they contain to other Bridges. This information allows GVRP-aware devices to dynamically establish and update their knowledge of the set of VLANs that currently have active members, and through which Ports those members can be reached. The main purpose of GVRP is to allow switches to automatically discover some of the VLAN information that would otherwise need to be manually configured.
GMRP(GARP Multicast Registration Protocol)
GMRP provides a mechanism that allows bridges and end stations to dynamically register group membership information with the MAC bridges attached to the same LAN segment and for that information to be disseminated across all bridges in the Bridged LAN that supports extended filtering services. The operation of GMRP relies upon the services provided by the GARP.

Feb 3, 2009

VMware Server

VMware Server 於二年多前已公告可以免費下載使用,我想,最主要原因還是 Microsoft Virtual PC, Xen .... 等競爭對手一一出現,今天本想在 WIndows 上使用 QEMU 安裝 CentOS5 測試一些東西,不知為何一直有問題,後來直接放棄改試試 VMware Server,安裝上沒問題難度,但一開始使用,有二個地方小卡了一下

  1. VMware Server 是利用web管理自已的系統(= =.這個該很久以前使用VMware Workstation的感覺剛全不一樣,不過那已經是五、六年前的事了),進入時會因為 ssl sing 的問題而被檔掉,需要自行加入例外
    Firefox : 工具 -> 選項 -> 檢視憑證清單 -> 伺服器 -> 加入例外清單
  2. 登入時,需要輸入帳號/密碼,這時指的是你電腦裡的帳號密碼

Feb 2, 2009

RADVD

前幾天測試使用RADVD來發送IPv6,只需 apt-get install radvd 但安裝時,/etc 下不會有config,需手動從 /usr/share/doc/radvd-doc/examples 中 Copy 到 /etc 下,起動 /etc/init.d/radvd start,此時可能會發生 IPv6 Forwoding 沒有設定,參考 Linux IPv6 HowTo 得知,echo "1" > /proc/sys/net/pv6/conf/default/forwarding 就可解決

以下是我使用簡單的 Config :
interface eth0
{
AdvSendAdvert on;

# This may be needed on some interfaces which are not active when
# radvd starts, but becomoe available later on; see man page for details.

# IgnoreIfMissing on;

#
# These settings cause advertisements to be sent every 3-10 seconds. This
# range is good for 6to4 with a dynamic IPv4 address, but can be greatly
# increased when not using 6to4 prefixes.
#

MinRtrAdvInterval 3;
MaxRtrAdvInterval 10;

#
# You can use AdvDefaultPreference setting to advertise the preference of
# the router for the purposes of default router determination.
# NOTE: This feature is still being specified and is not widely supported!
#
AdvDefaultPreference low;

#
# Disable Mobile IPv6 support
#
AdvHomeAgentFlag off;

#
# example of a standard prefix
#
prefix 2001:db8:1:0::/64
{
AdvOnLink on;
AdvAutonomous on;
AdvRouterAddr off;
};
};

Jan 28, 2009

Routing software on linux

還記得當時讀研究所時,使用過一套叫 zebra routing software,當時的感覺有如在linux建意一台cisco,當時最主要是為了IPv6而架起來試看看,剛讀了 IPv6 in Linux,文章中提到 RADVD (Linux IPv6 Router Advertisement Daemon),官網上的開頭簡介
The router advertisement daemon (radvd) is run by Linux or BSD systems acting as IPv6 routers. It sends Router Advertisement messages, specified by RFC 2461, to a local Ethernet LAN periodically and when requested by a node sending a Router Solicitation message. These messages are required for IPv6 stateless autoconfiguration.

This release includes support for Mobile IPv6, 6to4 addressing, router preferences and more specific routes, and non-broadcast multiple-access links such as ISATAP. Both Linux and BSD are supported. For more information about recent modifications, please see the CHANGES file included with the latest release of radvd.

從簡介可以得知,他是一套專門幫我們發送各種RA資訊的routing software,且支援Mobile IPv6, 6to4 ... bala bala,或許之後工作上於V6上的開發,這個會比Zebra更試合我 :),對了,Zebra於05年之後就不在maintain而目前主要是改過另一個計劃 Quagga

Jan 26, 2009

我的 VIM 整理

Search 搜尋功能
「 * 」 #vim 就會幫你尋找出這個字串的邊界,並且搜尋該字串。
「 \< 」 #表示的是一個字的頭 「 \> 」 : 代表的是一個字的尾,當你寫\就是以link結尾的字,
「 g* 」 #如果我不想打那麼多字,可是我想要的又不要完全是一樣的


Regular Expression
/blue119$ #找「blue119」結尾的字串
/^blue119 #找「blue119」開頭的字串
/blue[119] #找出 blue加上任何119的組合
/lemon tree\|lemon soup\|lemon juice #「 \| 」這個「或(or)」運算
/.*[^。] #找出忘了在句末補上句號的地方 (中括號出現「 ^ 」就表示除了 "。" 以外的字元都是想要比對的字元)
\{1,} #表示至少要出現一次(至少選一次)
\{,1} #表示最多出現一次(最多選一次)
「 * 」, \{0,} #0個到任意個都可以的
/1234[-]\{,1}[0-9]\{1,} && /1234-[0-9]\{1,}\|1234[0-9]* #1234- 1234-5 1234-56 1234-567 1234-789 1234-2399 1234349898

更詳細的資料
:h regular
:h pattern
:h regular-expression


游標移動
#跳下一頁
#跳上一頁
「zz」 #游標目前位置放置螢幕中間
:行數 #跳到你指定行數
m + (大小寫英文字母) #Mark完後,利用 ['(大小寫英文字母)]回到剛剛Mark的位置. ex.如我在第10行換下 [ma],移到二十行後在換下 ['a]就可回到剛剛的第十行位置
「`」連按兩次 #回到上一次跳到的地方

更詳細的資料
:h mark


取代置換功能「s」

:[range]s[ubstitute]/{pattern}/{string}/[flags] [count]

:'<,'>s/xxx/XXXX/g #利用 Visual mode 設定 [range], 按下大寫「V」然後移動游標反白到你想要的位置之後按「:」會跳到輸入指令的狀態
:1,300s/vim/VIM/g #設定[range]行數
:.,$s/vim/VIM/g #從現在游標所在行之後的所有行都置換
:.,1s/vim/VIM/g #從現在所在行之前的都要置換

範例:
aaaaaaaaa 111111111 111111111 aaaaaaaaa
bbbbbbbbb 222222222 222222222 bbbbbbbbb
ccccccccc 333333333 -> 333333333 ccccccccc
ddddddddd 444444444 444444444 ddddddddd
eeeeeeeee 555555555 555555555 eeeeeeeee
:%s/\([^0-9]\{1,}\)\([0-9]\{1,}\)/\2 \1/g

\( \) #括起來的,表示這是一個的單元, 依照它出現的順序而使用 \1, \2,…
[^0-9] #就表示非數字的部分
\{1,} #代表出現至少一次或用「\+」來代表至少出現一次

:h /multi #看到更多這些替代符號。


全域指令「:g」( global )

:[range]g[lobal]/{pattern}/[cmd]

:g/^[ \t]*$/d #砍掉空白行
:g/^$/d #砍掉空白行
:g/blue119/ #尋找
:g/小柴胡湯/nu #尋找+行數
:g!/[red123]/ #尋找但不包含特定字

:{range1}g/pattern1/{offset1};/pattern2/{offset2}{command}
:g/^.\{1,}$/,/^$/join! #段落只是用連續的分開,而你想要把所有的這些段落都合在一起
「join!」就是告訴 vim,在 /^.\{1,}$/ 和 /^$/ 之間的段落,通通都要合在一起(join)
「!」表示合併時不使用空白


vim 小技巧

計算有多少個搜尋關鍵字
:%s/pattern/&/g #&代表的意思就是用來表示前面比對的字串

整份文件全部合成一行
ggVGgJ (:%j!)(中文模式), ggVGJ (:%j)(英文模式)

移除文章中的^M
:%s/^M//g #^M = Ctrl+V & Ctrl+M or tr -d "\015" < filename1 > filename2


vim 的選擇模式 ( visual mode )

"ax #把整段程式碼剪下並貼到到暫存區 a
"ay #y 代表 yank,「拖拉」進指暫存器 a
"ap #貼上暫存器a的內容 (put)

更詳細的資料
:h visual-index


vim 的暫存區 register 功用

registers(暫存器)有下列幾種:
1. The unnamed register “”
2. 10 numbered registers “0 to “9
3. The small delete register “-
4. 26 named registers “a to “z or “A to “Z
5. four read-only registers “:, “., “% and “#
6. the expression register “=
7. The selection and drop registers “*, “+ and “~
8. The black hole register “_
9. Last search pattern register “/

Register 0 #register 0 就是幫你把最近一次做 yank 動作所存進去的東西。
Registers [1-9] #當你刪了某些字行會先進入 “1,當你又刪別的字行時,原先在 “1 的東西就會被放到 “2,這次刪的東西會進入 “1。
Registers [a-z] & [A-Z] #當你指定才會使用
"* #指的就是系統「剪貼簿」裡面的內容
": #就是指打的命令的暫存器
"/ #就是放搜尋的字串
". #放最近 insert 插入的文字
"- #放砍掉但不超過一行的文字
"% #指現在編輯的檔名
"_ #(黑洞暫存器),如果你刪除的動作不想要牽涉到任何暫存器

:let @a="Hello, world" #於"a 這個 register 放入 Hello, world 字串。
:let @a="" #清除某個暫存器
"[A-Z] #是附加方式而不是覆蓋
:di #看 register 裡有什麼東西
:g/pattern/y a #把每次比對到的那行都 yank 到 "a
:g/pattern/y A #指定的內容是要做附加到 “A
:g/pattern/. w >> filename #寫到某個檔案

更詳細的資料
:h registers


行數的顯示與利用

cat -n input_filename > output_filename #使用bash時

:%s/^.*$/\=line(".") . " " . submatch(0)/g #於行首加入行號
:%s/^/\=line(".")." "/ #於行首加入行號
line() #用來代表行數的
line()裡面的 "." #用來表示目前游標所在的地方
submatch(0) #用來表示前面所尋找的整個字串(pattern)
submatch(1) #用來表示第一個以 \(…\) 夾起來的子字串
開頭用 "\=" #可以作一些運算
「.」 #用來將字串與運作的結果相連

:set nu #看行號

更詳細的資料
:h sub-replace-expression


寫程式相關

「%」的游標移動方式。這個功能會選擇這些符號「 { [ ( 」的配對組合,也就是說當你在這些符號上面,比方說是「 { 」這個符號上按「 % 」游標會從「 { 」跳到它所對應「 } 」


Ctags 相關使用說明
Sigle folder

只需要 ctags -R 建立好索引後,進入 source code 就可利用 Ctrl+] 來找,回到原處按 Ctrl+t
臨時想到有個 function # :tag curve_extraction_algo
變數名字取得都一樣,在這個時候就會有多個選擇 #:tn & :tp

:h tags 得到更詳細的資訊


multi folder

1. making a shell script, call it "dirtags.sh"
#!/bin/sh
cd $1
ctags *

2. Now execute the following command:
find * -type d -exec dirtags.sh {} \;
to rebuild while making changes within a directory. The following vim key mapping :nmap ,t :!(cd %:p:h;ctags *.[ch])&

3. Build the global tag file:
cd ~/project
ctags --file-scope=no -R

4.
:set tags=./tags,tags,~/iEmbeddedSystem/QuantaSwitchSystem/LB4M-DIAG/tags

5. 推薦使用的 key map
imap :ls:bu
map :ls:bu
map :tn
map :tp


taglist 相關使用說明

:Tlist


cscope 相關使用說明

If you want, you can start it with a C symbol (ex: 'vim -t main')

Type "CTRL-\ s" (Control-backslash, then just 's') in quick succession, and you should see a menu at the bottom of your vim window showing you all the uses of the symbol in the program.
you can nest searches and CTRL-t will unwind them one at a time
via "CTRL-spacebar s". This time, your vim window will split in two horizontally , and the Cscope search result will be put in the new window.

:cs find {querytype} {name}
0 or s: Find this C symbol
1 or g: Find this definition
2 or d: Find functions called by this function
3 or c: Find functions calling this function
4 or t: Find this text string
6 or e: Find this egrep pattern
7 or f: Find this file
8 or i: Find files #including this file

setting the $CSCOPE_DB environment variable to point to a Cscope database you create, so you won't always need to launch vim in the same directory as the database.
find `pwd` -name '*.[sch]' > /tmp/cscope.files
cd /tmp
cscope -b -q
CSCOPE_DB=`pwd`/cscope.out; export CSCOPE_DB; cd -


Using Cscope on large projects (example: the Linux kernel)
For many projects, your find command may be as as simple as
cd /
find /my/project/dir -name '*.java' >/my/cscope/dir/cscope.files
For the Linux kernel
LNX=/home/jru/linux-2.4.18
cd /
find $LNX \
-path "$LNX/arch/*" ! -path "$LNX/arch/i386*" -prune -o \
-path "$LNX/include/asm-*" ! -path "$LNX/include/asm-i386*" -prune -o \
-path "$LNX/tmp*" -prune -o \
-path "$LNX/Documentation*" -prune -o \
-path "$LNX/scripts*" -prune -o \
-path "$LNX/drivers*" -prune -o \
-name "*.[chxsS]" -print >/tmp/cscope/cscope.files
Generate the Cscope database
cd /tmp/cscope # the directory with 'cscope.files'
cscope -b -q -k
Using the database.
CSCOPE_DB=/tmp/cscope/cscope.out; export CSCOPE_DB


視窗操作

Ctrl+w n #即 :new。開一空的新視窗。
Ctrl+w v #開一空的垂直新視窗。
Ctrl+w s #即 :sp(lit),會開一新視窗,且原檔分屬兩個視窗
Ctrl+w f #開一新視窗,並編輯游標所在處之 word 為檔名的檔案
Ctrl+w q #即 :q 結束分割出來的視窗
Ctrl+w o #即 :only! 使游標所在之視窗,成為目前唯一顯示的視窗其它視窗會隱藏起來
Ctrl+w j #移至下視窗
Ctrl+w k #移至上視窗
Ctrl+w _ #將此視視窗變大
Ctrl+w = #視窗同大
Ctrl+w 上、下、左、右 #移動curosr到其它視窗
:sp 檔名 #開另一新視窗來編輯檔案。


tabpage

:tabnew #開一個新的tab
:tabedit #filename 在新的tab編輯filename
:tabclose #關掉一個tab
gt #跳到下一個tab
gT #跳到前一個tab


[new undo] 用時間來做undo的依據

g- Go to older text state. With a count repeat that many
times. {not in Vi}

*:ea* *:earlier*
:earlier {count} Go to older text state {count} times.
:earlier {N}s Go to older text state about {N} seconds before.
:earlier {N}m Go to older text state about {N} minutes before.
:earlier {N}h Go to older text state about {N} hours before.

*g+*
g+ Go to newer text state. With a count repeat that many
times. {not in Vi}


*:lat* *:later*
:later {count} Go to newer text state {count} times.
:later {N}s Go to newer text state about {N} seconds later.
:later {N}m Go to newer text state about {N} minutes later.
:later {N}h Go to newer text state about {N} hours later.


拼字

]s #移至下一個拼錯或罕用的字。
[s #移至上一個拼錯或罕用的字。
]S #同 ]s,但只認完全拼錯的字。
[S #同 [s,但只認完全拼錯的字。
z= #檢查游標所在處的建議 words。
zg #加字於家目錄的字典檔。undo 鍵:zug,移除該字。
zw #同 zg,但標示此字為完全錯誤的字。undo 鍵 zuw,移除該字。

Jan 21, 2009

yum的常用指令整理

最近因為工作的關係,需要用CentOS,但平時自已都是使用Debian/GNU or Ubuntu,對yum用起來一直很不習慣,稍為整理一下,常會使用的指令

yum update [套件1] [...] #用來更新套件,若後面不加任何的套件,則會更新所有系統目前已經安裝了的套件
yum install 套件1 [...] #用來安裝套件
yum upgrade [套件1] [...] #連一些過舊即將洮汰的套件也一起版本升級動作
yum remove 套件1 [...] #移除套件
yum clean [packages|headers|oldheaders|all]
yum list [updates|installed|extras]
yum check-update #檢查可以更新的套件
yum info [updates|installed|extras]
yum provides 套件1 [...] #列出套件提供哪些檔案
yum search [參數] #搜尋套件

[轉錄]Google給網路創業者的14堂課

剛讀了 2006年3月 Cheers雜誌 Google給網路創業者的14堂課 簡短整理以下重點

【創業初期】
1.創業時規模愈小愈好
創業團隊愈少人,愈有助於建立共識,並有助於減少初期發展理念的爭執。
剛創立的新公司,最好只要有一個明確的目標,把這個目標全力做好就行了,別野心勃勃的想要做太多事情,那只會使發展方向與有限的資源分散,對新公司來說不是好事情。
創業團隊人數愈少,也愈能提高執行的效率,縮短團隊彼此溝通的時間。

2.別尋找臭味相投的創業搭檔
創辦人之間專業太相似,反而無法產生互補的效益。理想的創業團隊中,技術工程與業務能力是2項關鍵的能力,創辦人當中,若能彼此分工有人負責後台的技術工程,另外又有人在前線負責業務,將可提高成功機率,在此時,優先考量的是建立起工程與業務的基礎能力,那才是公司持續營運的關鍵。

3.採用開放原始碼的軟體
在創業資金有限的情況下,採用免費且開放原始碼的軟體,作為網站的基礎架構,將有助於減少資訊設備的花費。不管使用哪一種開放原始碼軟體,前提都是要確定對這個軟體有充分了解,下載之後的程式碼,能針對本身的需求自行修改程式。

4.使用現成的標準硬體設備
在兼顧價格與效能的考量上,採用高度標準化的PC。

5.早點宣布產品規劃,並經常宣布
可善用Blog做產品推廣,透過Blog,可以直接得知使用者的想法與建議,要注意的是,一旦使用者提出了具體的需求,若不能滿足,得要讓使用者知道不提供的原因。

【經營與資金】

6.別一開始就急著花大錢
一旦開始有新的產品或服務上市,別太急著砸大錢做行銷與宣傳,在尚未進入獲利的「燒錢」階段,手中的每一塊現金都十分珍貴,在產品還沒有被市場廣泛接受之前,將手中的現金,規畫到公司進入獲利階段才是上策。

7.適當時機尋找創投資金進入
當你的產品或是服務,已經開始在網路上流傳,或是至少有上千個使用者開始使用後,這時差不多該是你尋找創投資金的時候了,代表你的產品已經通過市場的初步考驗,證明你的公司可以站穩腳步,透過適度的引進創投資金,可以把經營規模放大,讓產品能更快、更有效率的推廣出去,加速跨過獲利的門檻。

8.別花太多時間在等待與尋找資金
在第一個產品成功之後,盡快展開第二階段的產品規劃,提高本身繼續經營的實力,這時,若手中還有現金,就別花太多心力與時間去尋找創投資金的奧援,延遲了後續產品持續開發的進度,妥善規畫現金運用以及產品開發的進度。

9.不用與金主過度妥協
對多數的創投來說,投資新公司最大的考量,就是標的盡快掛牌上市或是出售等「短期目標」,為創投公司創造投資報酬,因此,往往會干預標的公司的經營自主性。在尋找資金階段,最重要的是找到理念相近,並且能協助拓展的創投進入,若在經營方向發生衝突之際,適度堅持自主性則更重要。

【管理成長】
10.尋找聰明員工
企業最大資產就是員工的腦袋,而不是既有的軟體、硬體設備,尋找夠聰明、有創意的員工,是經營成功的必備條件。此外,當公司營運規模擴大之後,持續建構行銷與業務團隊也很重要,千萬別等到產品已經發展成功,能為公司創造營收之後,才開始找行銷與業務方面的員工。

11.慷慨且公平的對待員工
如何讓員工持續賣命則是最大的挑戰。若你希望優秀的員工,選擇投入經營風險更高的網路產業,而放棄好聽的頭銜、穩定的工作,那就應該在報酬上厚待員工。無論是股票選擇權或是薪資獎金上,將經營成果與員工共享,留住優秀的員工,在網路產業的經營上,都比任何產業重要。

12.業務從自身做起
在企業經營上有句諺語:明快果決的解雇不適任員工,並深思熟慮的雇用新員工。這句話現在已經不僅僅適用於業務員了,其他部門的員工也該奉行此準則,在企業營運中,最重要的莫過於銷售團隊的建立,透過創辦人親自帶領與建立銷售團隊,能維持一致的對外形象與服務品質。

13.開始尋找王牌主管帶領團隊
一旦你成功建立起銷售產品的團隊之後,下一步你可以開始思考聘請專家來帶領。所謂專家,往往是來自知名企業的業務主管,具有多年的業務經驗,在網路公司由小而大的關鍵時刻,能將過往的經驗帶入團隊中,開創更新、更大型的銷售專案,或是帶頭搶攻重要的企業客戶,過了這一關,你的網路公司就開始擺脫創立初期的階段,開始邁向業績起飛。

14.交棒給專業經理人
一旦成立的網路公司進入成長階段之後,最初的創辦人往往無法把公司帶往下一個階段,因此,創辦人選擇退位時機,尋找專業經理人來管理,將直接影響到下一步的成長。

Jan 20, 2009

[引用]redirect output from serial port

不過,我已經放了之前在那一個Blog找到的資料 XD

1. modify bios:
(1)Change BIOS settings /Server/Serial Console Features/BIOS Redirection Port to
[Serial port 1 or 2]
(2)change direct to modem

2. modify /boot/grub/menu.lst for suse
modify /boot/grub/grub.conf for red hat
console=ttyS0, 115200,vt100

3. modify /ect/inittab
c0:2345:respawn:/sbin/agetty ttyS0 19200 vt100

4. modify /etc/securetty
ttyS0

The Software Development Process

下面這段話是在 "A Byte of Pytho"所看到的

We have now gone through the various phases in the process of writing a software. These phases can be summarised as follows:
1. What (Analysis)
2. How (Design)
3. Do It (Implementation)
4. Test (Testing and Debugging)
5. Use (Operation or Deployment)
6. Maintain (Refinement)

Jan 9, 2009

rename your network card by udev config

my os is debian 5.0 testing
~# dpkg -l | grep udev
ii udev 0.125-7 /dev/ and hotplug management daemon


# This file was automatically generated by the /lib/udev/write_net_rules
# program, probably run by the persistent-net-generator.rules rules file.
#
# You can modify it, as long as you keep each rule on a single line.
# MAC addresses must be written in lowercase.

# PCI device 0x1106:0x3065 (via-rhine)
SUBSYSTEM=="net", DRIVERS=="?*", ATTRS{address}=="00:05:5d:07:48:e5", NAME="eth2"

# PCI device 0x8086:0x1079 (e1000)
SUBSYSTEM=="net", DRIVERS=="?*", ATTRS{address}=="00:04:23:a5:a4:b5", NAME="eth1"

# PCI device 0x8086:0x1079 (e1000)
SUBSYSTEM=="net", DRIVERS=="?*", ATTRS{address}=="00:04:23:a5:a4:b4", NAME="eth0"


define via-rhine is eth0, e1000(dual port) are eth1 and eth2

# PCI device 0x1106:0x3065 (via-rhine)
SUBSYSTEM=="net", DRIVERS=="?*", ATTRS{address}=="00:05:5d:07:48:e5", NAME="eth0"

# PCI device 0x8086:0x1079 (e1000)
SUBSYSTEM=="net", DRIVERS=="?*", ATTRS{address}=="00:04:23:a5:a4:b4", NAME="eth1"

# PCI device 0x8086:0x1079 (e1000)
SUBSYSTEM=="net", DRIVERS=="?*", ATTRS{address}=="00:04:23:a5:a4:b5", NAME="eth2"