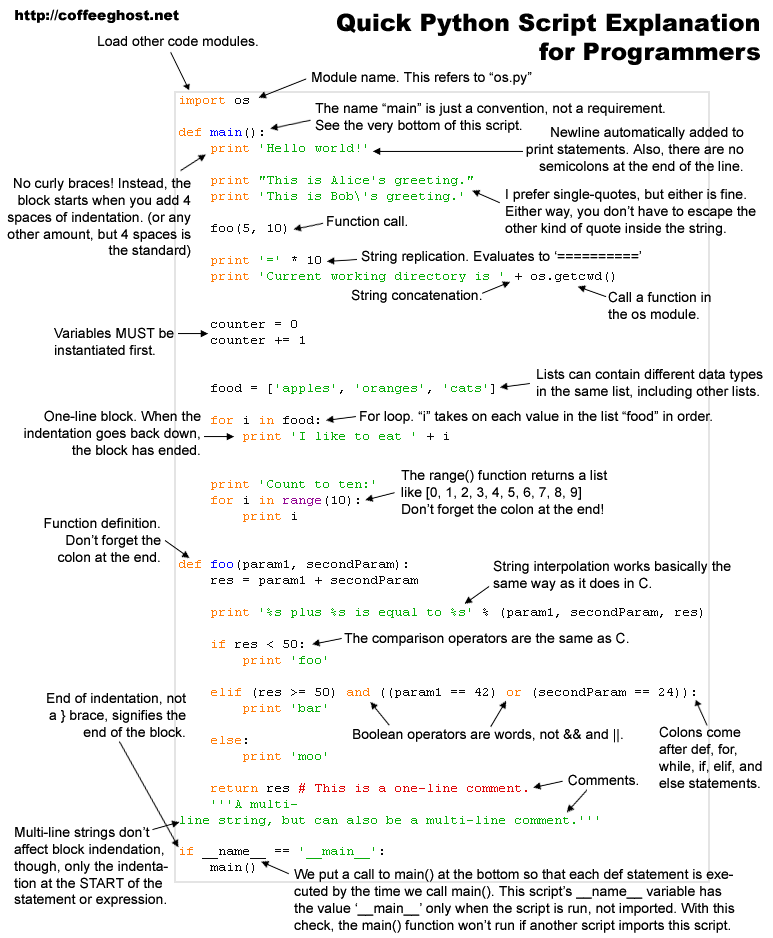
Quick Python Script Expalanation for Programmers from http://coffeeghost.net
中文版 from http://wiki.woodpecker.org.cn/

Python 2.6 Quick Reference
$ cat /boot/config-`uname -r` | grep KSM
CONFIG_KSM=y
pages_shared how many shared pages are being used
pages_sharing how many more sites are sharing them i.e. how much saved
pages_unshared how many pages unique but repeatedly checked for merging
pages_volatile how many pages changing too fast to be placed in a tree
full_scans how many times all mergeable areas have been scanned
run Whether the KSM process is running.
sleep_millisecs how many milliseconds ksmd should sleep before performing another page scan.
echo 1 > /sys/kernel/mm/ksm/run
/opt/bin/qemu -hda xp.raw -m 1024 &
/opt/bin/qemu -hda xp2.raw -m 1024 &


sudo modprobe 8021q
sudo vconfig add eth0 111
Added VLAN with VID == 111 to IF -:eth0:-
3. start up eth0.111
sudo ifconfig eth0.111 192.168.1.2 up
sudo ifconfig eth0.111 192.168.1.25. 利用 wireshark 抓出來的封包
eth0.111  Link encap:Ethernet  HWaddr 00:21:70:ff:d7:88
          inet addr:192.168.1.2  Bcast:192.168.1.255  Mask:255.255.255.0
          inet6 addr: fe80::221:70ff:feff:d788/64 Scope:Link
          UP BROADCAST RUNNING MULTICAST  MTU:1500  Metric:1
          RX packets:0 errors:0 dropped:0 overruns:0 frame:0
          TX packets:3 errors:0 dropped:0 overruns:0 carrier:0
          collisions:0 txqueuelen:0
          RX bytes:0 (0.0 B)  TX bytes:238 (238.0 B)
