最近部門開始要求要認真寫 functional spec,唉.. 但是沒有定義出正式的格式是什麼,之前在 maintain 部門的 code 時,發現這份 code 的 comment 是用 doxygen 的格式。
剛在網路上找到一份不錯的文章:簡介Doxygen
1. 先在 project 目錄打 doxygen -g doxy.conf; doxy.conf是產生的 config 檔,使用 doxy 之前先對你的 project 做相關的設定
2. doxygen doxy.con; doxygen 後面直接接你的 config 檔,執行玩會發現你的目錄多出二個檔案匝 html and latex。
Showing posts with label coding. Show all posts
Showing posts with label coding. Show all posts
Jun 1, 2010
Apr 27, 2010
auto-update tags
工作後,大部份的時間都在 windows 上 Coding,問了蠻多人,大多在 Windows 上寫Coding的人,大多是用 Source Insigne、Ultra Edit。自已本身是用Source Insigne一開始使用就有種,無痛上手的感覺,使用起來,完全沒有門檻,當然也試過 Vim + winCtags,光是要想辨法建tags,就搞了好久,後來就直接放棄。
而自已本身大多還是習慣在Linux的環境下,不外呼,vim + ctags + cscope + Tlist + ........ ,在這多種組合下,用的還算順手,但對於 tag 的 auto update,一直到最近才找到如何處理。
可以利用下面的 vim function,當存檔時,會自助幫你執行 append 新的 tag,但沒辨法利用 set tags 的變數來決定我 tags的位置,目前是直接放棄這個方式。
function! UPDATE_TAGS()let _f_ = expand("%:p")let _cmd_ = '"ctags -a -f /dvr/tags --c++-kinds=+p --fields=+iaS --extra=+q " ' . '"' . _f_ . '"'let _resp = system(_cmd_)unlet _cmd_unlet _f_unlet _respendfunctionautocmd BufWritePost *.cpp,*.h,*.c call UPDATE_TAGS()
AutoTag主要是提供一支 autotags.vim的plugin,使用方法很簡單,只要將此plugin放入你.vim/plugin內就可以,而它是使用python來implement auto update的功能,這對只會寫 python 看不懂 vim script在做什麼的我,因該也算是一種好處吧 ,哈哈。
今天,為了試看看,autotags.vim用在大型 project 速度上怎樣,我拿 linux kernel 2.6.31 來測試,做出來的 tags 約 85MB (arch/下只剩 powerpc的目錄),我隨便開啟一個檔案,編輯後存檔,大約花了 5 秒做 auto update的動作(CPU是C2D E6600 @ 2.4G),雖然花了5秒,但沒想像中的那麼慢,或許之後,可以思考如何去切而不是整個都包到同一個 tags 內。
在autotags.vim裡,有一個變數 __maxTagsFileSize 用來限定,tags的大小,預設是 7MB,如果你的 tags 超過這個大小,會直接放棄 update 的動作,當然,可以手動把它設大一點 :)。
除了 ctags,cscope也是一個很好用的 source browsing,支援比ctags更多的功能,但它的 cscope.out ,好像不支援 append 的功能,如要更新,要全部重做一次。Automatically create and update cscope database提供了一組 Hot-Key,來幫忙不用退出vim,"一指"完成。
Hot-Key如下:
nmap:!find . -iname '*.c' -o -iname '*.cpp' -o -iname '*.h' -o -iname '*.hpp' > cscope.files
Dec 2, 2009
coding style
以前有試過使用 indent 讓自已的 code 長的"漂亮"一點,但每次都是久久用一次,常也忘了,自已喜歡的 style 是那一種,這次把 indent 提供的 四種 style (gnu, kr, orig, linux),整理一下,直接用圖來表示,那下次在看就能很方便的知道,各 style 是長怎樣。另外,如 -gnu,是它的 condig style而真正的它下面那一長串是這個 style 的細節,當然也可以直接用那一長串,自已在慢慢調成你要的。

1. The GNU style: -gnu

4. The Linux style: -linux

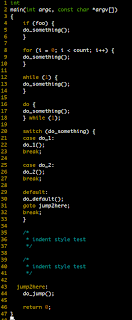
還未 indent 過的 source code.

-nbad -bap -nbc -bbo -bl -bli2 -bls -ncdb -nce -cp1 -cs -di2 -ndj -nfc1 -nfca -hnl -i2 -ip5 -lp -pcs -nprs -psl -saf -sai -saw -nsc -nsob

2. The Kernighan & Ritchie style: -kr

3. The original Berkeley style: : -orig
-nbad -bap -bbo -nbc -br -brs -c33 -cd33 -ncdb -ce -ci4 -cli0 -cp33 -cs -d0 -di1 -nfc1 -nfca -hnl -i4 -ip0 -l75 -lp -npcs -nprs -npsl -saf -sai -saw -nsc -nsob -nss

3. The original Berkeley style: : -orig
-nbad -nbap -bbo -bc -br -brs -c33 -cd33 -cdb -ce -ci4 -cli0 -cp33 -di16 -fc1 -fca -hnl -i4 -ip4 -l75 -lp -npcs -nprs -psl -saf -sai -saw -sc -nsob -nss -ts8

4. The Linux style: -linux
-nbad -bap -nbc -bbo -hnl -br -brs -c33 -cd33 -ncdb -ce -ci4 -cli0 -d0 -di1 -nfc1 -i8 -ip0 -l80 -lp -npcs -nprs -npsl -sai -saf -saw -ncs -nsc -sob -nfca -cp33 -ss -ts8 -il1

Subscribe to:
Posts (Atom)