- mkdir /opt/google/chrome/plugins
- cd /opt/google/chrome/plugins
- ln -s `dpkg -L sun-java6-bin | grep libnpjp2.so` .
May 4, 2010
讓 Chrome 支援 Java

recover juniper ex-4200's root password
今天跟Lab拿了一台 Juniper EX-4200 24Port L3 Switch,開機之後,發現,需要帳號,問了所有可能模過這台機器的同事,沒想到沒人知道有帳號這回事 = ="....,那不就是買了快一年的機器,都被亮在那裡沒人去動。
其實一拿到 juniper 的機器就有很多地方覺的很有趣,如:它的boot loader是用 u-boot,system是用 freebsd 改的,還有 csh or bash 可以用 @@",裡面有很多設計讓我大開眼境,不像 cisco like般,只有很單純的 cli 可以使用,而是你可以看到它與OS的整合,希望之後還有時間可以讓我慢慢玩這台機器。
recove的方法:
1. 開機之後,出現下列文字,快點按下你的 SPACE
Hit [Enter] to boot immediately, or space bar for command prompt.
Booting [/kernel] in 1 second...
2. 輸入 "boot -s"
3. 出現 "Enter full pathname of shell or 'recovery' for root password recovery or RETURN for /bin/sh" 輸入 recovery
4. 之後就能順立開機,進入 single mode,且只要按照它的指示做就好了
NOTE: Once in the CLI, you will need to enter configuration mode usingNOTE: the 'configure' command to make any required changes. For example,NOTE: to reset the root password, type:NOTE: configureNOTE: set system root-authentication plain-text-passwordNOTE: (enter the new password when asked)NOTE: commitNOTE: exitNOTE: exitNOTE: When you exit the CLI, you will be asked if you want to rebootNOTE: the system
Apr 29, 2010
hte: 超棒的 Hex's Editor
hte本身可以做到,hex edit 跟 分析 File formats,但目前使用上有一個缺點,它很多 binding-key 會跟 window manage衝到。

Apr 27, 2010
auto-update tags
工作後,大部份的時間都在 windows 上 Coding,問了蠻多人,大多在 Windows 上寫Coding的人,大多是用 Source Insigne、Ultra Edit。自已本身是用Source Insigne一開始使用就有種,無痛上手的感覺,使用起來,完全沒有門檻,當然也試過 Vim + winCtags,光是要想辨法建tags,就搞了好久,後來就直接放棄。
而自已本身大多還是習慣在Linux的環境下,不外呼,vim + ctags + cscope + Tlist + ........ ,在這多種組合下,用的還算順手,但對於 tag 的 auto update,一直到最近才找到如何處理。
可以利用下面的 vim function,當存檔時,會自助幫你執行 append 新的 tag,但沒辨法利用 set tags 的變數來決定我 tags的位置,目前是直接放棄這個方式。
function! UPDATE_TAGS()let _f_ = expand("%:p")let _cmd_ = '"ctags -a -f /dvr/tags --c++-kinds=+p --fields=+iaS --extra=+q " ' . '"' . _f_ . '"'let _resp = system(_cmd_)unlet _cmd_unlet _f_unlet _respendfunctionautocmd BufWritePost *.cpp,*.h,*.c call UPDATE_TAGS()
AutoTag主要是提供一支 autotags.vim的plugin,使用方法很簡單,只要將此plugin放入你.vim/plugin內就可以,而它是使用python來implement auto update的功能,這對只會寫 python 看不懂 vim script在做什麼的我,因該也算是一種好處吧 ,哈哈。
今天,為了試看看,autotags.vim用在大型 project 速度上怎樣,我拿 linux kernel 2.6.31 來測試,做出來的 tags 約 85MB (arch/下只剩 powerpc的目錄),我隨便開啟一個檔案,編輯後存檔,大約花了 5 秒做 auto update的動作(CPU是C2D E6600 @ 2.4G),雖然花了5秒,但沒想像中的那麼慢,或許之後,可以思考如何去切而不是整個都包到同一個 tags 內。
在autotags.vim裡,有一個變數 __maxTagsFileSize 用來限定,tags的大小,預設是 7MB,如果你的 tags 超過這個大小,會直接放棄 update 的動作,當然,可以手動把它設大一點 :)。
除了 ctags,cscope也是一個很好用的 source browsing,支援比ctags更多的功能,但它的 cscope.out ,好像不支援 append 的功能,如要更新,要全部重做一次。Automatically create and update cscope database提供了一組 Hot-Key,來幫忙不用退出vim,"一指"完成。
Hot-Key如下:
nmap:!find . -iname '*.c' -o -iname '*.cpp' -o -iname '*.h' -o -iname '*.hpp' > cscope.files
Dec 27, 2009
linux's core dump
core dump 的目地是當你的程式跑到一半當掉(異常中止跳出或freeze)時,我們可從 core 中得到最後掛在那裡,在加上 backtrace 就能快速的找出那裡有 bug :).
先認定 core file size: ulimit -a
 如果是 0 的話,我們需要先做一些動作,才有辨法開啟 core dump 的功能.
1. sudo vi /etc/security/limits.conf, 加入這行
設定完 core file size 之後,我使用下面程式來測試 debgu 的效果
執行結果為:
將 wrong.c 中的 func3 改成
compiler完之後,讓 wrong_loop 於背景執行
Reference:
先認定 core file size: ulimit -a
 如果是 0 的話,我們需要先做一些動作,才有辨法開啟 core dump 的功能.
1. sudo vi /etc/security/limits.conf, 加入這行
* soft core unlimited2. 開一個新的 terminal,輸入 ulimit -c,此時因該還是0, 利用 ulimit -c unlimited,更改成 unlimited。
設定完 core file size 之後,我使用下面程式來測試 debgu 的效果
/*
* file name: wrong.c
* gcc -g wrong.c -o wrong
*/

#include
#include

void func3()
{
//go to dia;
char *x = 0x0;
*x = 1;
printf("%s", x);
strcpy(x, "This is wrong");
}

void func2(void)
{
func3();
}

void func1(void)
{
func2();
}


int main(void)
{
func1();
return 0;
}
執行結果為:
程式記憶體區段錯誤 (core dumped)如沒有意外的話,因該可以看到多出了一個 core 的檔案
$file core有了 core file 之後,我們就可以利用 gdb 來做 backtrace
core: ELF 32-bit LSB core file Intel 80386, version 1 (SYSV), SVR4-style, from './wrong'
$ gdb wrong core
Core was generated by `./wrong'.我們大概可以知道是停在 func3 裡,透過 print 可知道,發生了什麼事
Program terminated with signal 11, Segmentation fault.
#0 0x08048264 in func3 () at wrong.c:8
warning: Source file is more recent than executable.
8
(gdb) p x另外,最好用的當然是 backtrace
$1 = 0x0
(gdb) p *x
Cannot access memory at address 0x0
(gdb) wherewhere 指令,我們能很清楚的知道是從
#0 0x08048264 in func3 () at wrong.c:8
#1 0x080482a4 in func2 () at wrong.c:15
#2 0x080482b1 in func1 () at wrong.c:20
#3 0x080482be in main () at wrong.c:26
(gdb) help where
Print backtrace of all stack frames, or innermost COUNT frames.
With a negative argument, print outermost -COUNT frames.
Use of the 'full' qualifier also prints the values of the local variables.
main -> func1 -> func2 -> func3另外還有一種情況是,程式掉進 trap,而不會觸發 SIGEGV signal,此時可以利用 xiaosuo 寫的 dumper 讓你所想要的程式觸發 signal 產生 core file。
將 wrong.c 中的 func3 改成
void func3()
{
 //go into loop;
 while(1){
     sleep(1);
 }
}
compiler完之後,讓 wrong_loop 於背景執行
./wrong_loop &當然,我們都知道,它是不會中止的,此時可以利用 dumper 來中止 wrong_loop 且產生 core file
[1] 31908
$ ./dumper 31908 -k產生了 core 我們就可利用 GDB 來debug
Start injecting(31908)...OK
[1]+ 不合法的命令 (core dumped) ./wrong_loop
$
$ file core
core: ELF 32-bit LSB core file Intel 80386, version 1 (SYSV), SVR4-style, from './wrong_loop'
$ gdb wrong_loop core
.....
Program terminated with signal 4, Illegal instruction.
#0 0xbfe0f4dc in ?? ()
(gdb) where
#0 0xbfe0f4dc in ?? ()
#1 0x08048266 in func3 () at wrong_loop.c:8
#2 0x08048273 in func2 () at wrong_loop.c:14
#3 0x08048280 in func1 () at wrong_loop.c:19
#4 0x0804828d in main () at wrong_loop.c:25
(gdb)
Reference:
Dec 13, 2009
UNISON 無法備份目錄的問題
最近買了新的 usb stick,試了一下 unison 此 sync 軟體,發現無法備份目錄,會出現
Reference:
fails to set permissions的 error,不過可自行更改一下 sync 的設定檔,加入下面二行
owner=false
perms=0
Reference:
Dec 2, 2009
coding style
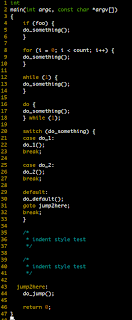
以前有試過使用 indent 讓自已的 code 長的"漂亮"一點,但每次都是久久用一次,常也忘了,自已喜歡的 style 是那一種,這次把 indent 提供的 四種 style (gnu, kr, orig, linux),整理一下,直接用圖來表示,那下次在看就能很方便的知道,各 style 是長怎樣。另外,如 -gnu,是它的 condig style而真正的它下面那一長串是這個 style 的細節,當然也可以直接用那一長串,自已在慢慢調成你要的。

1. The GNU style: -gnu

4. The Linux style: -linux

還未 indent 過的 source code.

-nbad -bap -nbc -bbo -bl -bli2 -bls -ncdb -nce -cp1 -cs -di2 -ndj -nfc1 -nfca -hnl -i2 -ip5 -lp -pcs -nprs -psl -saf -sai -saw -nsc -nsob

2. The Kernighan & Ritchie style: -kr

3. The original Berkeley style: : -orig
-nbad -bap -bbo -nbc -br -brs -c33 -cd33 -ncdb -ce -ci4 -cli0 -cp33 -cs -d0 -di1 -nfc1 -nfca -hnl -i4 -ip0 -l75 -lp -npcs -nprs -npsl -saf -sai -saw -nsc -nsob -nss

3. The original Berkeley style: : -orig
-nbad -nbap -bbo -bc -br -brs -c33 -cd33 -cdb -ce -ci4 -cli0 -cp33 -di16 -fc1 -fca -hnl -i4 -ip4 -l75 -lp -npcs -nprs -psl -saf -sai -saw -sc -nsob -nss -ts8

4. The Linux style: -linux
-nbad -bap -nbc -bbo -hnl -br -brs -c33 -cd33 -ncdb -ce -ci4 -cli0 -d0 -di1 -nfc1 -i8 -ip0 -l80 -lp -npcs -nprs -npsl -sai -saf -saw -ncs -nsc -sob -nfca -cp33 -ss -ts8 -il1

Nov 29, 2009
Nov 25, 2009
利用 rsa 登入 SSH Server
1. ssh-keygen -t rsa
3. ssh 你欲登入的主機
4. cat ~/.ssh/id_rsa.pub >> ~/.ssh/authorized_keys
5. chmod 711 ~/.ssh
6. chmod 644 ~/.ssh/authorized_keys
發現,用 ubuntu 9.10 完成以上這些動作,就可以直接登入主機,不需在使用 ssh-agent
Reference:
Generating public/private rsa key pair.2. scp ~/.ssh/*.pub 你欲登入的主機:~/.ssh/.
Enter file in which to save the key (/home/username/.ssh/id_rsa): [按 Enter 使用預設值(建議)]
Enter passphrase: 輸入你的 Passphrase
Enter same passphrase again: 再一次輸入你的 Passphrase
Your identification has been saved in /home/username/.ssh/id_rsa.
Your public key has been saved in /home/username/.ssh/id_rsa.pub.
The key fingerprint is: cc:e8:a9:da:a3:41:c6:a9:97:52:59:ef:0c:cf:45:b6 username@abc.com
3. ssh 你欲登入的主機
4. cat ~/.ssh/id_rsa.pub >> ~/.ssh/authorized_keys
5. chmod 711 ~/.ssh
6. chmod 644 ~/.ssh/authorized_keys
發現,用 ubuntu 9.10 完成以上這些動作,就可以直接登入主機,不需在使用 ssh-agent
Reference:
Nov 23, 2009
Diff & Merge tool
原本都是在 windows 下使用 WinMerge ,在Linux 下一直找不到好用的工具,上星期參加 H4 ,有人提到 vimdiff ,這二天 survey 了一下,有那些 diff merge tools 可以使用:
sdiff <- 單純印出,每一行的內容
vimdiff <- 好像沒辨法對目錄下所有的檔案做比較,希望可以像 meld 那樣
meld <- 目前試了一下,還不錯
kdiff3 <- 我大多是用 Gnome,不太想多裝 KDE lib
DiffMerge <- non-opensource
Reference:
sdiff <- 單純印出,每一行的內容
vimdiff <- 好像沒辨法對目錄下所有的檔案做比較,希望可以像 meld 那樣
meld <- 目前試了一下,還不錯
kdiff3 <- 我大多是用 Gnome,不太想多裝 KDE lib
DiffMerge <- non-opensource
Reference:
Visual Diff Tools in Linux
超棒的 Debian 小技巧
今早看到 Rex 於 H4 mail-list ,分享給大家的 fortunes-debian-hints's zh_TW.po 裡面寫了蠻多好用的小技巧。
Debian 小技巧 #1: 您可以使用 reportbug 套件中的 'reportbug' 指令來回報問題,或者也可使用圖形化介面 'reportbug-ng'。
Debian 小技巧 #2: 您可以使用 'dpkg-reconfigure' 變更在您第一次安裝一個套件時曾回答的問題。另外 'configure-debian' 套件為此提供了一個統一的介面。
Debian 小技巧 #3: 您可以使用 'apt-cache search <關鍵字>' 搜尋所有套件的描述的關鍵字。
Debian 小技巧 #4: 您可以使用 'apt-cache policy' 查看可用的以及已安裝的所有候選套件的版本資訊。
Debian 小技巧 #5: 如果您需要編譯一個自定的核心,請使用 kernel-package 套件中的 'make-kpkg' 指令稿。
Debian 小技巧 #6: 第 #6 個提示不存在。今天就來生一個!
Debian 小技巧 #7: 您可以使用 cron-apt 套件每晚自動下載您更新套件。
Debian 小技巧 #8: 如果您在 Debian 中遇到的問題,無法透過閱讀手冊和文件解決,那麼請到 Debian 用戶郵遞論壇詢問 (簡: debian-chinese-gb@lists.debian.org,繁: debian-chinese-big5@lists.debian.org)。
Debian 小技巧 #9: 如果您需要知道目前正在使用的 Debian 是什麼版本,請查看 /etc/debian_version;如果您想知道那個版本的開發代號 (例如: 3.0 的開發代號是'Woody'),請參考此連結: http://www.debian.org/doc/FAQ/ch-ftparchives.html#s-codenames
Debian 小技巧 #10: Debian 郵遞論壇討論使用者問題或者 Debian 政策文件。瀏覽 http://www.debian.org/MailingLists/ 並訂閱您所感興趣的內容吧。
Debian 小技巧 #11: 關心新聞 - 閱讀 Debian Times。請於線上瀏覽 http://times.debian.net/
Debian 小技巧 #12: 有一個 grep-dctrl 套件提供了若干指令,它們可用來快速搜索各種套件的 control 檔 (像是套件中的檔案)。
Debian 小技巧 #13: 如果您不喜歡使用某個 Debian 套件的預設選項,您可以把它的源碼下載下來,按照您的偏好重新編譯一個版本。請參考 http://www.debian.org/doc/FAQ/ch-pkg_basics.html (第 6.13 和 6.14 節) 瞭解更多資訊。不過請記住,大部分軟體的多數選項都能夠在執行時進行設定,通常不必重新編譯套件。
Debian 小技巧 #14: 如果您想追蹤某個套件的發展 (比如說,如果您希望瞭解缺陷回報,發行通知以及其它類似資訊),請考慮在套件追蹤系統 (Package Tracking System)中訂閱。您可以於此找到有關套件跟蹤系統 (PTS) 的更多資訊:http://www.debian.org/doc/manuals/developers-reference/resources.html (第 4.10 節)
Debian 小技巧 #15: 一般而言套件的文件可以在 /usr/share/doc/ 下找到。特別注意 README.Debian 文件專門提供 Debian 專屬資訊。
Debian 小技巧 #16: 如果您正在搜索一個不知道屬於那個套件的檔案,請試試 'apt-file',它為這類資訊提供了一個小型的資料庫。或者您也可以從 Debian 套件資料庫中搜索這些內容,也可以進行檔案搜尋:"http://www.debian.org/distrib/packages#search_contents
Debian 小技巧 #17: 想找一些人聊聊 Debian 嗎? 如果您習慣於 IRC (Intenret Relay Chat) 聊天,只要安裝您慣用的 IRC 軟體,然後加入 irc.debian.org 的 #debian 或 #dot 或 #debian-zh 頻道就可以了。
Debian 小技巧 #18: 在 http://packages.qa.debian.org/ 可以找到套件的品管資訊。這個頁面提供了維護人員的品質保證網頁、BTS、套件新聞、以及檔案庫中的可用版本。
Debian 小技巧 #19: 如果您對從封裝軟體套件感興趣,您應該考慮安裝 apt-src 這個套件。
Debian 小技巧 #20: 想要持續追蹤某個您已安裝的套件版本紀錄 (對那些混用 stable / testing / unstable 系統的人尤其有用)?請試試 apt-show-versions。
Debian 小技巧 #21: 如果您的 Debian 機器所使用的連線速度很慢,但是您可以使用另一個比較快的網路,那麼請試試 apt-zip 套件。
Debian 小技巧 #22: 正在猶豫使用哪個 Debian 鏡像站?請試試 apt-spy 和 netselect-apt 套件,它們可以為您測試不同網站的速度。
Debian 小技巧 #23: 若您的系統佔用了太多的硬碟空間,請試試 deborphan 套件。它能建議您哪些套件是無用的且可刪除的。當然,別忘了清除掉 APT 暫存 (使用 'apt-get clean'、'aptitude clean'、或者 aptitude 工具選單中的 '動作'->'清除套件暫存' 選項)。
Debian 小技巧 #24: 如果您想感謝某個維護者對於所處理的問題的辛勞,請試試reportbug --kudos。
Debian 小技巧 #25: 'debian-reference' 套件為 Debian 使用者和開發人員提供了非常廣泛的參考文件。其中大多數資訊都在這個連結:http://www.debian.org/doc/manuals/reference。
Debian 小技巧 #26: 如果一個套件沒有足夠的參考文件,那麼請查找名為-doc 的套件,並確認已經安裝。通常含有大量文件的套件會被拆開,這是考慮到某些使用者並不想安裝文件。
Debian 小技巧 #27: 請定期檢查您的備份。您*確定*備份無誤了,對吧? 對吧?(此技巧帶給您的當頭棒喝是 '徹' '底' '崩' '潰',以及「空」。)
Debian 小技巧 #28: 如果您的機器並非持續處於開機狀態 (例如一台筆記型電腦),請試試 'anacron' 套件。即使在機器並未開機,它能夠確保讓該定期執行的軟體依然被啟動。
Debian 小技巧 #29: 保持您系統時鐘的精確性 - 請安裝 'ntpdate' 套件並且設定為每次開機自動啟動。另外,經常開機的機器應該通過安裝 'ntp' 套件在每次開機時進校時。
Debian 小技巧 #30: 若安裝了 'doc-base' 和 'doc-central' 套件以及相依的套件後,就可以從 http://localhost/ 來瀏覽文件囉。
Debian 小技巧 #31: 停用一個特定 runlevel 的開機服務,應該是將 /etc/rc.d 中以 S 開頭的鏈接變更為 K 開頭的鏈接,而不是刪除那個鏈接。如果所有的鏈接都被刪除了,那麼系統在下次安裝升級套件時都將假定它們需要被替換。
Debian 小技巧 #34: 有一個 'doc-debian' 套件提供了一些有關 Debian 項目的通用文件。它還有西班牙語版本 (doc-debian-es)、法語版本 (doc-debian-fr) 和烏克蘭語版本 (doc-debian-uk)。
Debian 小技巧 #35: 'devscripts' 套件為那些希望改進 Debian 的使用者提供了一些有用的指令,如 wnpp-alert, rc-alert 以及 bts。
Debian 小技巧 #36: 如果您希望追蹤 Debian 開發版 (sid),但只有少量的下載權限或者一個頻寬很小的網路,請試試 debdelta 套件。
Debian 小技巧 #37: 搜尋遊戲嗎 ? 試試 'goplay' 吧,它提供了一個很棒的使用介面可瀏覽各種類型的遊戲。
Debian 小技巧 #38: 需要一些比 Debian 穩定版更新的套件,但又不願升級到 'testing' 或者 'unstable' 嗎? 有些更新套件擺在 volatile.debian.org,另一些套件可在 www.backports.org 找到。
Debian 小技巧 #39: 希望下載一個套件但卻不想安裝它?請用 'aptitude download'。
Debian 小技巧 #40: 想學會使用軟體的新技巧嗎? \"man\" 是你最佳好友! 在 shell 下打 \"man <程式名稱>\" 或者打 \"man -H <程式名稱>\" 在瀏覽器下閱讀操作手冊。
Debian 小技巧 #41: 安裝 bash-completion 軟體套件可增強 bash's 的 tab 補齊功能。
Debian 小技巧 #42: 如果你安裝了 command-not-found,當你鍵入系統未安裝之軟體時候,系統將會自動提醒你應該安裝那個套件。
Debian 小技巧 #3: 您可以使用 'apt-cache show <套件名稱>' 或 'aptitude show <套件名稱> 來取得套件的詳細描述。
Debian 小技巧 #44: 您可以使用 'apt-file list <套件名稱> 來查詢套件中所包含得檔案。這個指令很接近 dpkg -L,只是不需要安裝或先下載該套件。
Debian 小技巧 #1: 您可以使用 reportbug 套件中的 'reportbug' 指令來回報問題,或者也可使用圖形化介面 'reportbug-ng'。
Debian 小技巧 #2: 您可以使用 'dpkg-reconfigure
Debian 小技巧 #3: 您可以使用 'apt-cache search <關鍵字>' 搜尋所有套件的描述的關鍵字。
Debian 小技巧 #4: 您可以使用 'apt-cache policy
Debian 小技巧 #5: 如果您需要編譯一個自定的核心,請使用 kernel-package 套件中的 'make-kpkg' 指令稿。
Debian 小技巧 #6: 第 #6 個提示不存在。今天就來生一個!
Debian 小技巧 #7: 您可以使用 cron-apt 套件每晚自動下載您更新套件。
Debian 小技巧 #8: 如果您在 Debian 中遇到的問題,無法透過閱讀手冊和文件解決,那麼請到 Debian 用戶郵遞論壇詢問 (簡: debian-chinese-gb@lists.debian.org,繁: debian-chinese-big5@lists.debian.org)。
Debian 小技巧 #9: 如果您需要知道目前正在使用的 Debian 是什麼版本,請查看 /etc/debian_version;如果您想知道那個版本的開發代號 (例如: 3.0 的開發代號是'Woody'),請參考此連結: http://www.debian.org/doc/FAQ/ch-ftparchives.html#s-codenames
Debian 小技巧 #10: Debian 郵遞論壇討論使用者問題或者 Debian 政策文件。瀏覽 http://www.debian.org/MailingLists/ 並訂閱您所感興趣的內容吧。
Debian 小技巧 #11: 關心新聞 - 閱讀 Debian Times。請於線上瀏覽 http://times.debian.net/
Debian 小技巧 #12: 有一個 grep-dctrl 套件提供了若干指令,它們可用來快速搜索各種套件的 control 檔 (像是套件中的檔案)。
Debian 小技巧 #13: 如果您不喜歡使用某個 Debian 套件的預設選項,您可以把它的源碼下載下來,按照您的偏好重新編譯一個版本。請參考 http://www.debian.org/doc/FAQ/ch-pkg_basics.html (第 6.13 和 6.14 節) 瞭解更多資訊。不過請記住,大部分軟體的多數選項都能夠在執行時進行設定,通常不必重新編譯套件。
Debian 小技巧 #14: 如果您想追蹤某個套件的發展 (比如說,如果您希望瞭解缺陷回報,發行通知以及其它類似資訊),請考慮在套件追蹤系統 (Package Tracking System)中訂閱。您可以於此找到有關套件跟蹤系統 (PTS) 的更多資訊:http://www.debian.org/doc/manuals/developers-reference/resources.html (第 4.10 節)
Debian 小技巧 #15: 一般而言套件的文件可以在 /usr/share/doc/
Debian 小技巧 #16: 如果您正在搜索一個不知道屬於那個套件的檔案,請試試 'apt-file',它為這類資訊提供了一個小型的資料庫。或者您也可以從 Debian 套件資料庫中搜索這些內容,也可以進行檔案搜尋:"http://www.debian.org/distrib/packages#search_contents
Debian 小技巧 #17: 想找一些人聊聊 Debian 嗎? 如果您習慣於 IRC (Intenret Relay Chat) 聊天,只要安裝您慣用的 IRC 軟體,然後加入 irc.debian.org 的 #debian 或 #dot 或 #debian-zh 頻道就可以了。
Debian 小技巧 #18: 在 http://packages.qa.debian.org/
Debian 小技巧 #19: 如果您對從封裝軟體套件感興趣,您應該考慮安裝 apt-src 這個套件。
Debian 小技巧 #20: 想要持續追蹤某個您已安裝的套件版本紀錄 (對那些混用 stable / testing / unstable 系統的人尤其有用)?請試試 apt-show-versions。
Debian 小技巧 #21: 如果您的 Debian 機器所使用的連線速度很慢,但是您可以使用另一個比較快的網路,那麼請試試 apt-zip 套件。
Debian 小技巧 #22: 正在猶豫使用哪個 Debian 鏡像站?請試試 apt-spy 和 netselect-apt 套件,它們可以為您測試不同網站的速度。
Debian 小技巧 #23: 若您的系統佔用了太多的硬碟空間,請試試 deborphan 套件。它能建議您哪些套件是無用的且可刪除的。當然,別忘了清除掉 APT 暫存 (使用 'apt-get clean'、'aptitude clean'、或者 aptitude 工具選單中的 '動作'->'清除套件暫存' 選項)。
Debian 小技巧 #24: 如果您想感謝某個維護者對於所處理的問題的辛勞,請試試reportbug --kudos。
Debian 小技巧 #25: 'debian-reference' 套件為 Debian 使用者和開發人員提供了非常廣泛的參考文件。其中大多數資訊都在這個連結:http://www.debian.org/doc/manuals/reference。
Debian 小技巧 #26: 如果一個套件沒有足夠的參考文件,那麼請查找名為
Debian 小技巧 #27: 請定期檢查您的備份。您*確定*備份無誤了,對吧? 對吧?(此技巧帶給您的當頭棒喝是 '徹' '底' '崩' '潰',以及「空」。)
Debian 小技巧 #28: 如果您的機器並非持續處於開機狀態 (例如一台筆記型電腦),請試試 'anacron' 套件。即使在機器並未開機,它能夠確保讓該定期執行的軟體依然被啟動。
Debian 小技巧 #29: 保持您系統時鐘的精確性 - 請安裝 'ntpdate' 套件並且設定為每次開機自動啟動。另外,經常開機的機器應該通過安裝 'ntp' 套件在每次開機時進校時。
Debian 小技巧 #30: 若安裝了 'doc-base' 和 'doc-central' 套件以及相依的套件後,就可以從 http://localhost/ 來瀏覽文件囉。
Debian 小技巧 #31: 停用一個特定 runlevel 的開機服務,應該是將 /etc/rc
Debian 小技巧 #34: 有一個 'doc-debian' 套件提供了一些有關 Debian 項目的通用文件。它還有西班牙語版本 (doc-debian-es)、法語版本 (doc-debian-fr) 和烏克蘭語版本 (doc-debian-uk)。
Debian 小技巧 #35: 'devscripts' 套件為那些希望改進 Debian 的使用者提供了一些有用的指令,如 wnpp-alert, rc-alert 以及 bts。
Debian 小技巧 #36: 如果您希望追蹤 Debian 開發版 (sid),但只有少量的下載權限或者一個頻寬很小的網路,請試試 debdelta 套件。
Debian 小技巧 #37: 搜尋遊戲嗎 ? 試試 'goplay' 吧,它提供了一個很棒的使用介面可瀏覽各種類型的遊戲。
Debian 小技巧 #38: 需要一些比 Debian 穩定版更新的套件,但又不願升級到 'testing' 或者 'unstable' 嗎? 有些更新套件擺在 volatile.debian.org,另一些套件可在 www.backports.org 找到。
Debian 小技巧 #39: 希望下載一個套件但卻不想安裝它?請用 'aptitude download
Debian 小技巧 #40: 想學會使用軟體的新技巧嗎? \"man\" 是你最佳好友! 在 shell 下打 \"man <程式名稱>\" 或者打 \"man -H <程式名稱>\" 在瀏覽器下閱讀操作手冊。
Debian 小技巧 #41: 安裝 bash-completion 軟體套件可增強 bash's 的 tab 補齊功能。
Debian 小技巧 #42: 如果你安裝了 command-not-found,當你鍵入系統未安裝之軟體時候,系統將會自動提醒你應該安裝那個套件。
Debian 小技巧 #3: 您可以使用 'apt-cache show <套件名稱>' 或 'aptitude show <套件名稱> 來取得套件的詳細描述。
Debian 小技巧 #44: 您可以使用 'apt-file list <套件名稱> 來查詢套件中所包含得檔案。這個指令很接近 dpkg -L,只是不需要安裝或先下載該套件。
Nov 22, 2009
dns timing issus when install ttf-mscorefonts
安裝 ttf-mscorefonts 會出現某些檔案無法下載,主要是因為下載時,wget 的參數 timeout 設的太短了,可參考 ubuntu Bug #431217
以下做簡單的筆記:
1. sudo vi /var/lib/dpkg/info/ttf-mscorefonts-installer.postinst #改成下面的內容
以下做簡單的筆記:
1. sudo vi /var/lib/
2. sudo dpkg --configure -a#!/bin/bash
#Version: 1.0
#Info: Bash script to install mscorefonts without using
#currently broken ttf-mscorefonts-installer (3.0) for
#Ubuntu 9.10 Karmic Koala (date: 03/11/09)#Author: Jonathan K.
#Website: http://www.friendlytec hninja. vndv.com
#Email:#License: This is free to use and distribute (for free only) as long as
#credit is given to original author.#Create temp and mscorefonts dir
sudo mkdir /usr/share/fonts/truetype/ mscorefonts
mkdir /tmp/mscorefonts
cd /tmp/mscorefonts#Download links
wget http://sourceforge. net/projects/ corefonts/ files/the% 20fonts/ final/andale32. exe/download? use_mirror= cdnetworks- kr-1
wget http://sourceforge. net/projects/ corefonts/ files/the% 20fonts/ final/arial32. exe/download? use_mirror= cdnetworks- kr-1
wget http://sourceforge. net/projects/ corefonts/ files/the% 20fonts/ final/arialb32. exe/download? use_mirror= cdnetworks- kr-1
wget http://sourceforge. net/projects/ corefonts/ files/the% 20fonts/ final/comic32. exe/download? use_mirror= cdnetworks- kr-1
wget http://sourceforge. net/projects/ corefonts/ files/the% 20fonts/ final/courie32. exe/download? use_mirror= cdnetworks- kr-1
wget http://sourceforge. net/projects/ corefonts/ files/the% 20fonts/ final/georgi32. exe/download? use_mirror= cdnetworks- kr-1
wget http://sourceforge. net/projects/ corefonts/ files/the% 20fonts/ final/impact32. exe/download? use_mirror= cdnetworks- kr-1
wget http://sourceforge. net/projects/ corefonts/ files/the% 20fonts/ final/times32. exe/download? use_mirror= cdnetworks- kr-1
wget http://sourceforge. net/projects/ corefonts/ files/the% 20fonts/ final/trebuc32. exe/download? use_mirror= cdnetworks- kr-1
wget http://sourceforge. net/projects/ corefonts/ files/the% 20fonts/ final/verdan32. exe/download? use_mirror= cdnetworks- kr-1
wget http://sourceforge. net/projects/ corefonts/ files/the% 20fonts/ final/webdin32. exe/download? use_mirror= cdnetworks- kr-1 #Extract all .tff files
cabextract *.exe -F*.ttf -L#Rename files and move files
sudo cp andalemo.ttf /usr/share/fonts/truetype/ mscorefonts/ Andale_ Mono.ttf
sudo cp ariali.ttf /usr/share/fonts/truetype/ mscorefonts/ Arial_Italic. ttf
sudo cp arialbd.ttf /usr/share/fonts/truetype/ mscorefonts/ Arial_Bold. ttf
sudo cp arialbi.ttf /usr/share/fonts/truetype/ mscorefonts/ Arial_Bold_ Italic. ttf
sudo cp arial.ttf /usr/share/fonts/truetype/ mscorefonts/ Arial.ttf
sudo cp ariblk.ttf /usr/share/fonts/truetype/ mscorefonts/ Arial_Black. ttf
sudo cp comicbd.ttf /usr/share/fonts/truetype/ mscorefonts/ Comic_Sans_ MS_Bold. ttf
sudo cp comic.ttf /usr/share/fonts/truetype/ mscorefonts/ Comic_Sans_ MS.ttf
sudo cp cour.ttf /usr/share/fonts/truetype/ mscorefonts/ Courier_ New.ttf
sudo cp courbd.ttf /usr/share/fonts/truetype/ mscorefonts/ Courier_ New_Bold. ttf
sudo cp courbi.ttf /usr/share/fonts/truetype/ mscorefonts/ Courier_ New_Bold_ Italic. ttf
sudo cp couri.ttf /usr/share/fonts/truetype/ mscorefonts/ Courier_ New_Italic. ttf
sudo cp georgiaz.ttf /usr/share/fonts/truetype/ mscorefonts/ Georgia_ Bold_Italic. ttf
sudo cp georgiab.ttf /usr/share/fonts/truetype/ mscorefonts/ Georgia_ Bold.ttf
sudo cp georgiai.ttf /usr/share/fonts/truetype/ mscorefonts/ Georgia_ Italic. ttf
sudo cp georgia.ttf /usr/share/fonts/truetype/ mscorefonts/ Georgia. ttf
sudo cp impact.ttf /usr/share/fonts/truetype/ mscorefonts/ Impact. ttf
sudo cp times.ttf /usr/share/fonts/truetype/ mscorefonts/ Times_New_ Roman.ttf
sudo cp timesbd.ttf /usr/share/fonts/truetype/ mscorefonts/ Times_New_ Roman_Bold. ttf
sudo cp timesbi.ttf /usr/share/fonts/truetype/ mscorefonts/ Times_New_ Roman_Bold_ Italic. ttf
sudo cp timesi.ttf /usr/share/fonts/truetype/ mscorefonts/ Times_New_ Roman_Italic. ttf
sudo cp trebuc.ttf /usr/share/fonts/truetype/ mscorefonts/ Trebuchet_ MS.ttf
sudo cp trebucbd.ttf /usr/share/fonts/truetype/ mscorefonts/ Trebuchet_ MS_Bold. ttf
sudo cp trebucbi.ttf /usr/share/fonts/truetype/ mscorefonts/ Trebuchet_ MS_Bold_ Italic. ttf
sudo cp trebucit.ttf /usr/share/fonts/truetype/ mscorefonts/ Trebuchet_ MS_Italic. ttf
sudo cp verdanab.ttf /usr/share/fonts/truetype/ mscorefonts/ Verdana_ Bold.ttf
sudo cp verdanai.ttf /usr/share/fonts/truetype/ mscorefonts/ Verdana_ Italic. ttf
sudo cp verdanaz.ttf /usr/share/fonts/truetype/ mscorefonts/ Verdana_ Bold_Italic. ttf
sudo cp verdana.ttf /usr/share/fonts/truetype/ mscorefonts/ Verdana. ttf
sudo cp webdings.ttf /usr/share/fonts/truetype/ mscorefonts/ Webdings. ttf #Clean up
cd ~
rm -r /tmp/mscorefonts
應該選那一個 File System 呢?
Linux 2.6.28 之後,開始支援 EXT4,最近重灌 ubuntu 9.10 發現多了 EXT4 可以選擇,一開始還不確定是不是要直接升級到 EXT4 ,剛剛 Survey 了一下,我想,下直別想那麼多了,直接使用 EXT4 就好了
Reference:
Reference:

我的舊筆電 M2N 裝 Ubuntu 9.10
Reference: Ubuntu karmic freeze on Asus M2n
之前M2N上一直是使用 ubuntu 8.04 一直沒有升級,這次等 9.10 一出,一口氣從新安裝新版的 ubuntu,中間出現蠻多相容性的問題。
1. ubuntu 9.10 安裝時,多增加
之前M2N上一直是使用 ubuntu 8.04 一直沒有升級,這次等 9.10 一出,一口氣從新安裝新版的 ubuntu,中間出現蠻多相容性的問題。
1. ubuntu 9.10 安裝時,多增加
acpi=off and nolapic2. 安裝完之後,更改 grub 開機參數
/etc/default/grub3. xorg.conf 改使用 vesa
GRUB_CMDLINE_LINUX_DEFAULT 中加入 nolapic nomodeset
Section "Device"
Identifier "Configured Video Device"
Driver "vesa"
EndSection
Section "Monitor"
Identifier "Configured Monitor"
EndSection
Section "Screen"
Identifier "Default Screen"
Monitor "Configured Monitor"
Device "Configured Video Device"
EndSection
Nov 16, 2009
dvtm || dynamic virtual terminal manager
上星期參加H4,看到這個有好玩的東西,下面是 Hot Key 筆記
Keyboard commands
Mod : 預設為 ^g, 更改於 config.h 或 -m 的方式
Mod-c : 新增一個 window.
Mod-x : 關閉目前 window.
Mod-l : 增加 5% 主視窗的寬度.
Mod-h : 減加 5% 主視窗的寬度.
Mod-j : 移到下一個視窗.
Mod-k : 移到上一個視窗.
Mod-[1..n] : 移到第 n 個視窗
Mod-. : Toggle minimization of current window.
Mod-u : Focus next non minimized window.
Mod-i : Focus prev non minimized window.
Mod-m : Maximize current window (change to fullscreen layout).
Mod-PageUp : Scroll up.
Mod-PageDown : Scroll down.
Mod-Space : Toggle between defined layouts (affects all windows).
Mod-Enter : Zooms/cycles current window to/from master area.
Mod-t : Change to vertical stack tiling layout.
Mod-b : Change to bottom stack tiling layout.
Mod-g : Change to grid layout.
Mod-s : Shows/hides the status bar.
Mod-r : Redraw whole screen.
Mod-G : Escape the next typed key.
Mod-X : Lock screen.
Mod-M : Toggle dvtm mouse grabbing. Mod-q Quit dvtm.
Mouse commands
Copy and Paste : 按 SHIFT 加左鍵反白要 Copy 的文字,SHIFT 加中鍵為貼上
Button1 click : Select window.
Button1 double click : Select window and toggle maximization.
Button2 click : Zooms/cycles current window to/from master area.
Button3 click : Toggle minimization of current window.
延申閱讀:
Keyboard commands
Mod : 預設為 ^g, 更改於 config.h 或 -m 的方式
Mod-c : 新增一個 window.
Mod-x : 關閉目前 window.
Mod-l : 增加 5% 主視窗的寬度.
Mod-h : 減加 5% 主視窗的寬度.
Mod-j : 移到下一個視窗.
Mod-k : 移到上一個視窗.
Mod-[1..n] : 移到第 n 個視窗
Mod-. : Toggle minimization of current window.
Mod-u : Focus next non minimized window.
Mod-i : Focus prev non minimized window.
Mod-m : Maximize current window (change to fullscreen layout).
Mod-PageUp : Scroll up.
Mod-PageDown : Scroll down.
Mod-Space : Toggle between defined layouts (affects all windows).
Mod-Enter : Zooms/cycles current window to/from master area.
Mod-t : Change to vertical stack tiling layout.
Mod-b : Change to bottom stack tiling layout.
Mod-g : Change to grid layout.
Mod-s : Shows/hides the status bar.
Mod-r : Redraw whole screen.
Mod-G : Escape the next typed key.
Mod-X : Lock screen.
Mod-M : Toggle dvtm mouse grabbing. Mod-q Quit dvtm.
Mouse commands
Copy and Paste : 按 SHIFT 加左鍵反白要 Copy 的文字,SHIFT 加中鍵為貼上
Button1 click : Select window.
Button1 double click : Select window and toggle maximization.
Button2 click : Zooms/cycles current window to/from master area.
Button3 click : Toggle minimization of current window.
延申閱讀:
Apr 9, 2009
財報發佈時間
- [月報]:次月的10日之前,只需要提供營收不需要獲利
- [季報]:4月30日及10月31日前,需要提供獲利狀況
- [半年報]:8月31日前,除了提供獲利還需要提供合併報表
- [年報]:次年的4月30日日前,需提供最完整的財務資料
Mar 30, 2009
ubuntu gusty to hardy
今天重開回到之前灌的 ubuntu ,本來想直接升級到 8.10 發現版本差太多,安裝時就會出問題,所以先升級到 hardy 就好,但開完機發現,鍵盤數字鍵無法使用,原來是我的鍵盤鍵被改成滑鼠 XD,可以使用 Ctrl+Shift+Num 切回數字鍵功能,剛剛在網路上查,原來是 X-Window 快速鍵
Subscribe to:
Posts (Atom)